startActivityForResult相关

startActivityResult这个方法其实做Android开发的都应该很熟悉了,但是可能还是有人不知道Fragment里也有这个方法。虽然之前在Fragment里写代码的时候看到过这个方法,也能猜出来能干啥,但是最近才第一次用到,所以总结一下。首先在使用上就不多说了,在Fragment中和在Activity中使用startActivityForResult的方式是一样的,Fragment也有onActivityResult方法可供重写,但是记住不要调用getActivity().startActivityForResult方法,这就是两回事了。

表现

首先看在使用上会有什么问题。我们遇到的比较典型的就是在一个Activity中嵌套一个Fragment,在两个页面里都有startActivityForResult的调用,也都重写了onActivityResult,然后调用方法并收到返回的结果。这时候我们会发现在各自页面里都收到返回的数据,也能对上对应的requestCode,但是,在Activity里也能收到在Fragment里的请求结果,但是requestCode对不上。从这个表现我们能大概猜测出来,Fragment的startActivityForResult和对应的onActivityResult也是借助Activity对应的方法来实现,只是做了一点处理来避免冲突。

源码

猜测当然是不严谨的,还是看源码来的实在。先看Fragment里的源码:

1
2
3
4
5
6
7
8
9
10
11
12
13
14
15
16
17
18
19
20
21
22
23
24
25
26
27
28
29
30
31
32
33
34
35
36
37
38
39
40
41
42
43
44
45
46
47
48
49
50
/**
* Called by Fragment.startActivityForResult() to implement its behavior.
*/

public void startActivityFromFragment(Fragment fragment, Intent intent,
int requestCode, @Nullable Bundle options)
{

mStartedActivityFromFragment = true;
try {
if (requestCode == -1) {
ActivityCompat.startActivityForResult(this, intent, -1, options);
return;
}
checkForValidRequestCode(requestCode);
int requestIndex = allocateRequestIndex(fragment);
ActivityCompat.startActivityForResult(
this, intent, ((requestIndex + 1) << 16) + (requestCode & 0xffff), options);
} finally {
mStartedActivityFromFragment = false;
}
}

// Allocates the next available startActivityForResult request index.
private int allocateRequestIndex(Fragment fragment) {
// Sanity check that we havn't exhaused the request index space.
if (mPendingFragmentActivityResults.size() >= MAX_NUM_PENDING_FRAGMENT_ACTIVITY_RESULTS) {
throw new IllegalStateException("Too many pending Fragment activity results.");
}

// Find an unallocated request index in the mPendingFragmentActivityResults map.
while (mPendingFragmentActivityResults.indexOfKey(mNextCandidateRequestIndex) >= 0) {
mNextCandidateRequestIndex =
(mNextCandidateRequestIndex + 1) % MAX_NUM_PENDING_FRAGMENT_ACTIVITY_RESULTS;
}

int requestIndex = mNextCandidateRequestIndex;
mPendingFragmentActivityResults.put(requestIndex, fragment.mWho);
mNextCandidateRequestIndex =
(mNextCandidateRequestIndex + 1) % MAX_NUM_PENDING_FRAGMENT_ACTIVITY_RESULTS;

return requestIndex;
}

/**
* Checks whether the given request code is a valid code by masking it with 0xffff0000. Throws
* an {@link IllegalArgumentException} if the code is not valid.
*/

static void checkForValidRequestCode(int requestCode) {
if ((requestCode & 0xffff0000) != 0) {
throw new IllegalArgumentException("Can only use lower 16 bits for requestCode");
}
}

源码很简单,注释也很清楚。首先对是否由Fragment发起请求做一个判断,然后如果requestCode为-1则直接正常调用父Activity的startActivityForResult方法,因为requestCode为-1代表调用的是startActivity方法。然后对requestCode做一个过滤,,必须小于0xffff0000。接着因为一个Activity可能有多个Fragment,所以还要拿到请求的序号。然后就是调用ActivityCompat.startActivityForResult了:

1
2
3
4
5
6
7
8
9

public static void startActivityForResult(Activity activity, Intent intent, int requestCode,
@Nullable Bundle options)
{

if (Build.VERSION.SDK_INT >= 16) {
ActivityCompatJB.startActivityForResult(activity, intent, requestCode, options);
} else {
activity.startActivityForResult(intent, requestCode);
}
}

这里就没啥好说的了。那么关键就在调用之前对requestCode的处理那里了,那里并没有直接传入requestCode,而是传入((requestIndex + 1) << 16) + (requestCode & 0xffff)。requestIndex是Fragment的请求序号,这一个转换比较明确的表达就是:

1
2

(requestIndex + 1) * 65536 + requestCode

ok,这里我们也能猜到一点东西了,就是用这个公式来对requestCode做区分,使对应的Activity和Fragment们都能得到正确的回调而不会发生冲突。那么我们再看ActivityonActivityResult方法来验证一下:

1
2
3
4
5
6
7
8
9
10
11
12
13
14
15
16
17
18
19
20
21
22
23
24
25
26
27
28

/**
* Dispatch incoming result to the correct fragment.
*/

@Override
protected void onActivityResult(int requestCode, int resultCode, Intent data) {
mFragments.noteStateNotSaved();
int requestIndex = requestCode>>16;
if (requestIndex != 0) {
requestIndex--;

String who = mPendingFragmentActivityResults.get(requestIndex);
mPendingFragmentActivityResults.remove(requestIndex);
if (who == null) {
Log.w(TAG, "Activity result delivered for unknown Fragment.");
return;
}
Fragment targetFragment = mFragments.findFragmentByWho(who);
if (targetFragment == null) {
Log.w(TAG, "Activity result no fragment exists for who: " + who);
} else {
targetFragment.onActivityResult(requestCode & 0xffff, resultCode, data);
}
return;
}

super.onActivityResult(requestCode, resultCode, data);
}

看得出来基本与猜测的一致,在onActivityResult里会拿着requestCode推出requestIndex,再推出对应的Fragment和对应的requestCode,再调用Fragment的onActivityResult方法完成回调。整个流程结束。

结论

根据源码的分析,基本能解释了开始提到的表现都是什么原因。Fragment的startActivityForResult这一整套流程都要借助父Activity对应的方法来实现,所以在Activity里自然也能拦截到返回的数据,但是因为requestCode被做了处理,所以无法映射到正确的requestCode。看了这个源码只能说Fragment给Google挖的坑太大了···

startActivityForResult在Adapter里如何解耦

在搜索今天这篇东西相关的资料的时候看到了这个问题,觉得还挺有意思的。现在的页面越来越复杂,Adapter也越来越复杂,虽然现在几乎Adapter里都会传入Activity,但是理论上来说Adapter只是一个适配器,应该只负责View和data的绑定,而不应该做太多的逻辑处理。所以我目前想到的比较合理的解耦方式应该是Adapter向外界暴露对应的startActivityForResultonActivityResult两个方法,类似今天分析的源码Fragment所做的那样,这样做也可以避免处理Fragment和Activity不同的问题,无论Adapter在哪里使用都不受影响。如果Adapter更复杂,具体的逻辑已经被拆成了单个的item来实现,那么对应的item也暴露这两个方法,然后交给Adapter来代理,requestCode也交给Adapter来管理。这应该是比较合理的解耦方式。

Retrofit源码分析

基本概念

最近把之前看过的Retrofit的源码翻出来研究一下。

Retrofit现在不像两年前是个新鲜事物,大版本已经到Retrofit2了,越来越多的新项目和开源项目会理所应当地使用OkHttp + Retrofit + RxJava + Gson这一套进行网络请求,这也侧面反映了Retrofit的强大(插一句,这几个库厉害不代表会用就厉害,其实用了就知道,这几个的搭配使用的优势就是傻瓜化)。优秀的框架在使用和扩展上会越来越简单,同时又会更强大,在我看来Retrofit相对于Volley以及更早的框架就是这样。而这时候只会用是不够的,知其然且知其所以然,才能真正学到本事。

这篇分析基于Retrofit2.2.0。

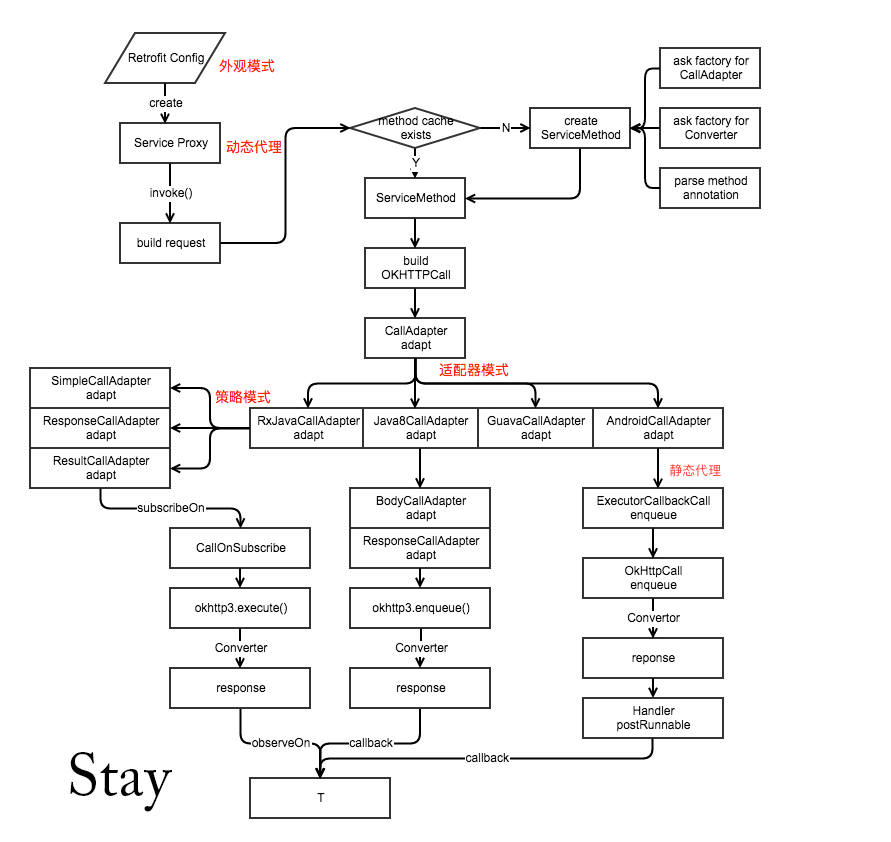
基本流程

这里就不自己画了,借助stay大神的图,毕竟这张图画的太完美了:

源码分析

还是以官方的示例代码来看:

1
2
3
4
5

public interface GitHubService {
@GET("users/{user}/repos")
Call<List<Repo>> listRepos(@Path("user") String user);
}

这个接口用过Retrofit的都算是很熟了,然后再用Retrofit创建一个接口的实现:

1
2
3
4
5
6

Retrofit retrofit = new Retrofit.Builder()
.baseUrl("https://api.github.com/")
.build();

GitHubService service = retrofit.create(GitHubService.class);

这里是一个明显的建造者模式+外观模式,也算是如今许多开源项目的套路了。然后是进行网络请求了:

1
2

Call<List<Repo>> repos = service.listRepos("octocat");

官网的示例到此结束,一般情况下使用Retrofit都是这么个套路,最多就是在配置时加上Gson或者RxJava。接下来我们开始分析源码,还是从入口开始,关键点在创建API实例的create(class)方法,我们看这部分源码:

1
2
3
4
5
6
7
8
9
10
11
12
13
14
15
16
17
18
19
20
21
22
23
24
25
26

public <T> T create(final Class<T> service) {
Utils.validateServiceInterface(service);
if (validateEagerly) {
eagerlyValidateMethods(service);
}
return (T) Proxy.newProxyInstance(service.getClassLoader(), new Class<?>[] { service },
new InvocationHandler() {
private final Platform platform = Platform.get();

@Override public Object invoke(Object proxy, Method method, Object[] args)
throws Throwable {

// If the method is a method from Object then defer to normal invocation.
if (method.getDeclaringClass() == Object.class) {
return method.invoke(this, args);
}
if (platform.isDefaultMethod(method)) {
return platform.invokeDefaultMethod(method, service, proxy, args);
}
ServiceMethod<Object, Object> serviceMethod =
(ServiceMethod<Object, Object>) loadServiceMethod(method);
OkHttpCall<Object> okHttpCall = new OkHttpCall<>(serviceMethod, args);
return serviceMethod.callAdapter.adapt(okHttpCall);
}
});
}

这里我刚开始看的时候完全不明白,在查了InvocationHandler相关的知识之后才了解这里用到了Java的动态代理技术。在这里,就是动态生成我们所写的API接口的实现类,创建一个实例,然后把对方法的调用转发给new出来的InvocationHandler,在invoke方法中执行接口实现类的逻辑。
然后我们再看其中的具体逻辑。第一步中源码有注释,如果调用的是Object类的方法(toString这些),那就直接调用。第二步如果是default方法就调用default方法,这个default方法来自Java8,具体见这篇Java8 默认方法。然后就是关键部分了,因为我们在使用的时候不可能是前两种情况,我们调用的都是我们自己写的接口的方法,接下来这几行代码就是请求的具体过程了:

1
2
3
4
5
6
7
8
9
10
11
12
13
14
15
16
17
18
19

ServiceMethod<Object, Object> serviceMethod =
(ServiceMethod<Object, Object>) loadServiceMethod(method);
OkHttpCall<Object> okHttpCall = new OkHttpCall<>(serviceMethod, args);
return serviceMethod.callAdapter.adapt(okHttpCall);

ServiceMethod<?, ?> loadServiceMethod(Method method) {
ServiceMethod<?, ?> result = serviceMethodCache.get(method);
if (result != null) return result;

synchronized (serviceMethodCache) {
result = serviceMethodCache.get(method);
if (result == null) {
result = new ServiceMethod.Builder<>(this, method).build();
serviceMethodCache.put(method, result);
}
}
return result;
}

loadServiceMethod方法里创建了一个ServiceMethod的实例,并且在中间实现了缓存逻辑。然后再看ServiceMethod里的逻辑:

1
2
3
4
5
6
7
8
9
10
11
12
13
14
15

ServiceMethod(Builder<R, T> builder) {
this.callFactory = builder.retrofit.callFactory();
this.callAdapter = builder.callAdapter;
this.baseUrl = builder.retrofit.baseUrl();
this.responseConverter = builder.responseConverter;
this.httpMethod = builder.httpMethod;
this.relativeUrl = builder.relativeUrl;
this.headers = builder.headers;
this.contentType = builder.contentType;
this.hasBody = builder.hasBody;
this.isFormEncoded = builder.isFormEncoded;
this.isMultipart = builder.isMultipart;
this.parameterHandlers = builder.parameterHandlers;
}

通过ServiceMethod的构造方法,我们基本能知道这个类的成员变量都有哪些。首先看我们比较眼熟的两个成员变量,responseConvertercallAdapter,因为搭配使用过RxJava + Retrofit + Gson的人都知道在创建Retrofit实例的时候是这么写的:

1
2
3
4
5
6

Retrofit retrofit = new Retrofit.Builder()
.baseUrl(baseUrl)
.addConverterFactory(GsonConverterFactory.create())
.addCallAdapterFactory(RxJavaCallAdapterFactory.create())
.build();

先看 ServiceMethodcallAdapter相关的方法:

1
2
3
4
5
6
7
8
9
10
11
12
13
14
15
16
17
18

private CallAdapter<T, R> createCallAdapter() {
Type returnType = method.getGenericReturnType();
if (Utils.hasUnresolvableType(returnType)) {
throw methodError(
"Method return type must not include a type variable or wildcard: %s", returnType);
}
if (returnType == void.class) {
throw methodError("Service methods cannot return void.");
}
Annotation[] annotations = method.getAnnotations();
try {
//noinspection unchecked
return (CallAdapter<T, R>) retrofit.callAdapter(returnType, annotations);
} catch (RuntimeException e) { // Wide exception range because factories are user code.
throw methodError(e, "Unable to create call adapter for %s", returnType);
}
}

可以看到这个成员变量的callAdapter还是由Retrofit来提供,在Retrofit类内部有这样一个方法:

1
2
3
4
5
6
7
8
9
10
11
12
13
14
15
16
17
18
19
20
21
22
23
24
25
26
27
28
29
30
31
32
33
34

public CallAdapter<?, ?> callAdapter(Type returnType, Annotation[] annotations) {
return nextCallAdapter(null, returnType, annotations);
}

public CallAdapter<?, ?> nextCallAdapter(CallAdapter.Factory skipPast, Type returnType,
Annotation[] annotations) {
checkNotNull(returnType, "returnType == null");
checkNotNull(annotations, "annotations == null");

int start = adapterFactories.indexOf(skipPast) + 1;
for (int i = start, count = adapterFactories.size(); i < count; i++) {
CallAdapter<?, ?> adapter = adapterFactories.get(i).get(returnType, annotations, this);
if (adapter != null) {
return adapter;
}
}

StringBuilder builder = new StringBuilder("Could not locate call adapter for ")
.append(returnType)
.append(".\n");
if (skipPast != null) {
builder.append(" Skipped:");
for (int i = 0; i < start; i++) {
builder.append("\n * ").append(adapterFactories.get(i).getClass().getName());
}
builder.append('\n');
}
builder.append(" Tried:");
for (int i = start, count = adapterFactories.size(); i < count; i++) {
builder.append("\n * ").append(adapterFactories.get(i).getClass().getName());
}
throw new IllegalArgumentException(builder.toString());
}

在这里会遍历一个CallAdapter.Factory的列表,直到找到可用的工厂,我们在构建Retrofit时传入的RxJavaCallAdapterFactory就是在这里要使用的。然后再看responseConverter这个成员变量的相关方法:

1
2
3
4
5
6
7
8
9

private Converter<ResponseBody, T> createResponseConverter() {
Annotation[] annotations = method.getAnnotations();
try {
return retrofit.responseBodyConverter(responseType, annotations);
} catch (RuntimeException e) { // Wide exception range because factories are user code.
throw methodError(e, "Unable to create converter for %s", responseType);
}
}

看起来还是由Retrofit来提供:

1
2
3
4
5
6
7
8
9
10
11
12
13
14
15
16
17
18
19
20
21
22
23
24
25
26
27
28
29
30
31
32
33
34
35
36

public <T> Converter<ResponseBody, T> responseBodyConverter(Type type, Annotation[] annotations) {
return nextResponseBodyConverter(null, type, annotations);
}

public <T> Converter<ResponseBody, T> nextResponseBodyConverter(Converter.Factory skipPast,
Type type, Annotation[] annotations) {
checkNotNull(type, "type == null");
checkNotNull(annotations, "annotations == null");

int start = converterFactories.indexOf(skipPast) + 1;
for (int i = start, count = converterFactories.size(); i < count; i++) {
Converter<ResponseBody, ?> converter =
converterFactories.get(i).responseBodyConverter(type, annotations, this);
if (converter != null) {
//noinspection unchecked
return (Converter<ResponseBody, T>) converter;
}
}

StringBuilder builder = new StringBuilder("Could not locate ResponseBody converter for ")
.append(type)
.append(".\n");
if (skipPast != null) {
builder.append(" Skipped:");
for (int i = 0; i < start; i++) {
builder.append("\n * ").append(converterFactories.get(i).getClass().getName());
}
builder.append('\n');
}
builder.append(" Tried:");
for (int i = start, count = converterFactories.size(); i < count; i++) {
builder.append("\n * ").append(converterFactories.get(i).getClass().getName());
}
throw new IllegalArgumentException(builder.toString());
}

大体逻辑毫无二致。
ServiceMethod里另外两个比较关键的成员变量分别是callFactoryparameterHandlerscallFactory本质是okhttp3.Call.Factory,在Retrofit的构建过程中也可以传入自己实现的okhttp3.Call.Factory,如果没有,则会默认创建一个OkHttpClient。再看parameterHandlers

1
2
3
4
5
6
7
8
9
10
11
12
13
14
15
16
17
18
19
20
21
22
23
24
25

private ParameterHandler<?> parseParameter(
int p, Type parameterType, Annotation[] annotations) {
ParameterHandler<?> result = null;
for (Annotation annotation : annotations) {
ParameterHandler<?> annotationAction = parseParameterAnnotation(
p, parameterType, annotations, annotation);

if (annotationAction == null) {
continue;
}

if (result != null) {
throw parameterError(p, "Multiple Retrofit annotations found, only one allowed.");
}

result = annotationAction;
}

if (result == null) {
throw parameterError(p, "No Retrofit annotation found.");
}

return result;
}

因为我们我们在写业务层的API时都是通过注解传入参数的,它的作用就是解析每个参数使用的注解类型并进行处理。到这里ServiceMethod这部分基本解释结束。在这个类里面,核心的就是三个工厂:okhttp3.Call.FactoryCallAdapter.FactoryConverter.Factory,核心的模块全部交给工厂来做,外界可以通过传入自己的工厂实现对流程的完全控制,真正做到了高内聚低耦合(虽然在我看来okhttp3.Call.Factory还是有点强依赖于OkHttp)。
ServiceMethod看完了,再看OkHttpCall。它实现了retrofit2.Call接口,execute()enqueue(callback)这两种请求都是在这里来做。先看execute():

1
2
3
4
5
6
7
8
9
10
11
12
13
14
15
16
17
18
19
20
21
22
23
24
25
26
27
28
29
30
31
32
33
34
35
36
37
38
39
40
41
42
43
44
45
46
47
48
49
50
51
52
53
54
55
56
57
58
59
60
61
62
63
64
65
66
67
68
69
70
71
72
73
74
75
76
77
78

@Override public Response<T> execute() throws IOException {
okhttp3.Call call;

synchronized (this) {
if (executed) throw new IllegalStateException("Already executed.");
executed = true;

if (creationFailure != null) {
if (creationFailure instanceof IOException) {
throw (IOException) creationFailure;
} else {
throw (RuntimeException) creationFailure;
}
}

call = rawCall;
if (call == null) {
try {
call = rawCall = createRawCall();
} catch (IOException | RuntimeException e) {
creationFailure = e;
throw e;
}
}
}

if (canceled) {
call.cancel();
}

return parseResponse(call.execute());
}

private okhttp3.Call createRawCall() throws IOException {
Request request = serviceMethod.toRequest(args);
okhttp3.Call call = serviceMethod.callFactory.newCall(request);
if (call == null) {
throw new NullPointerException("Call.Factory returned null.");
}
return call;
}

Response<T> parseResponse(okhttp3.Response rawResponse) throws IOException {
ResponseBody rawBody = rawResponse.body();

// Remove the body's source (the only stateful object) so we can pass the response along.
rawResponse = rawResponse.newBuilder()
.body(new NoContentResponseBody(rawBody.contentType(), rawBody.contentLength()))
.build();

int code = rawResponse.code();
if (code < 200 || code >= 300) {
try {
// Buffer the entire body to avoid future I/O.
ResponseBody bufferedBody = Utils.buffer(rawBody);
return Response.error(bufferedBody, rawResponse);
} finally {
rawBody.close();
}
}

if (code == 204 || code == 205) {
rawBody.close();
return Response.success(null, rawResponse);
}

ExceptionCatchingRequestBody catchingBody = new ExceptionCatchingRequestBody(rawBody);
try {
T body = serviceMethod.toResponse(catchingBody);
return Response.success(body, rawResponse);
} catch (RuntimeException e) {
// If the underlying source threw an exception, propagate that rather than indicating it was
// a runtime exception.
catchingBody.throwIfCaught();
throw e;
}
}

execute()方法里的代码并不多,其实就是一个构造请求、请求网络、解析返回数据的过程。在createRawCall()的时候就可以用serviceMethodcallFactory来构造具体请求。在处理返回数据的时候responseConverter也就派上了用场。

1
2
3
4
5
6
7
8
9
10
11
12
13
14
15
16
17
18
19
20
21
22
23
24
25
26
27
28
29
30
31
32
33
34
35
36
37
38
39
40
41
42
43
44
45
46
47
48
49
50
51
52
53
54
55
56
57
58
59
60
61
62
63
64
65
66
67
68
69

@Override public void enqueue(final Callback<T> callback) {
if (callback == null) throw new NullPointerException("callback == null");

okhttp3.Call call;
Throwable failure;

synchronized (this) {
if (executed) throw new IllegalStateException("Already executed.");
executed = true;

call = rawCall;
failure = creationFailure;
if (call == null && failure == null) {
try {
call = rawCall = createRawCall();
} catch (Throwable t) {
failure = creationFailure = t;
}
}
}

if (failure != null) {
callback.onFailure(this, failure);
return;
}

if (canceled) {
call.cancel();
}

call.enqueue(new okhttp3.Callback() {
@Override public void onResponse(okhttp3.Call call, okhttp3.Response rawResponse)
throws IOException {

Response<T> response;
try {
response = parseResponse(rawResponse);
} catch (Throwable e) {
callFailure(e);
return;
}
callSuccess(response);
}

@Override public void onFailure(okhttp3.Call call, IOException e) {
try {
callback.onFailure(OkHttpCall.this, e);
} catch (Throwable t) {
t.printStackTrace();
}
}

private void callFailure(Throwable e) {
try {
callback.onFailure(OkHttpCall.this, e);
} catch (Throwable t) {
t.printStackTrace();
}
}

private void callSuccess(Response<T> response) {
try {
callback.onResponse(OkHttpCall.this, response);
} catch (Throwable t) {
t.printStackTrace();
}
}
});
}

代码看起来长,但是大体逻辑与同步请求没有本质区别,只是在异步的callback里进行返回数据的处理。到这里,一次完整的请求就完成了。

总结

其实Retrofit的诱人之处完全不止于此,许多人使用Retrofit都是冲着RxJavaCallAdapterFactoryGsonConverterFactory去的,如果有更深的兴趣,可以读一下这些Factory的具体实现的代码,因为不只有RxJavaCallAdapterFactoryGsonConverterFactory这两个,还有Java8CallAdapterFactoryJacksonConverterFactory这些工厂。当然我们也可以根据需求写我们自己的工厂。另外Retrofit里的CallAdapter默认使用的是OkHttp,我们完全也可以用其他的框架替代OkHttp。Retrofit除了充足的扩展性,另一个就是它对设计模式的灵活运用,包括刚开始提到的门面模式,建造者模式,还有工厂模式,另外在这些工厂的具体实现里还有策略模式和装饰模式。具体可以看这一篇Retrofit分析-经典设计模式案例。总之,Retrofit确实是一个优质的网络封装库,而且它用不多的代码却实现了模块的完全解耦和充分的扩展性,源码很值得一读。

阅读源码的半程总结-读源码都读什么

讲完了为什么要读源码,然后再说读源码都读什么。我应该不会写怎么读的问题了,毕竟看代码跟写代码不一样,属于一个很玄学的东西,每个人都有自己的一套思路。

那么读源码都读什么?说到底也就是读源码能学到什么?从我自己的角度,大概能分为几个角度:学习优秀的解决方案;学习优秀的代码风格;学习设计模式的使用场景;学习搭架构的思路;学习一些平时没见过和想不到的黑科技。

学习优秀的解决方案

这个算是读源码比较功利也比较实际的用途。同一个需求永远都会有不同的解决方案,这时候就可以通过看类似框架的源码来搞清楚最成熟的解决方案是什么。一个简单的例子,在我们现有的项目中图片选择器采用了获取图片和视频绝对路径的方案,最终为了显示视频缩略图,我还必须定制一下Glide。但是知乎最近开源的Matisse,获取的就是图片和文件content:// 格式的URL,Glide在解析这种路径有对应的MediaStoreStreamLoader,完美解决了展示视频缩略图的问题。虽然同样解决了问题,但是Matisse解决的似乎就更加优雅。

学习优秀的代码风格

只学代码风格,我个人觉得最好读一些通用的、底层的东西。比如Java的代码风格,那就去读JDK一些常用类,Js的代码风格,我个人可能就会看看经典的jQuery或者vue.js。没有什么三方库的代码会比它们的代码更简洁,使用更准确。

学习设计模式

写代码过了初级阶段,多多少少都会开始用到设计模式,无论是刻意还是无意。可是设计模式那么多种,书里教了这是怎么回事,到了真正设计架构的时候,却不知道该用哪种了。简单的单例模式、建造者模式、工厂方法模式就不说了,基本都是固定的套路和使用场景。但是到了稍微复杂点的,我是确实不清楚该不该用,该用哪种,该怎么用。用少了,代码不解耦,扩展性差,不好维护。用多了,变成了“面向设计模式编程”,代码量成倍扩张,却没做多少事。这时候就有优质的源码给我们铺路了。

在被动读了OkHttp之后,我后来又主动重读了一遍。大家都知道Interceptor是OkHttp一个很强大的接口,利用这个接口几乎可以在一个完整的请求中做任何事情。但是其实在OkHttp内部也是用Interceptor做了重定向、连接服务器、发送和接收请求以及缓存这些事情,连在一起,就是一个责任链模式。

在项目里我没有用过Picasso,但是因为它和Glide使用方法的相似性,我花时间看了它的源码。然后我才发现Picasso和Glide完全走了两个极端,Picasso算是大道至简,只有一个包,能不做的事情都不做,所有目的都只为图片的加载。而Glide则开放了所有的接口,所有步骤都可以定制,甚至可以像我那样为具体需求增加自己的feature。但是为什么我们会觉得他们用起来差不多呢?说到底他们都用了外观模式,我们在调用的时候只知道拿起Glide和Picasso开始用,其他的工作都交给内部去做了。

而我读过的源码中设计模式的集大成者,应该是Retrofit了。这个库的源码不多不少,但是加上配套的一堆Adapter和Convertor,外观模式、代理模式、策略模式、适配器模式、装饰模式都用到了,甚至同一个接口不同的实现都可以用到不同的设计模式。完全解耦,所有步骤与Glide一样都可以定制。

对于设计模式的学习,我个人的感受还是应该多看多写才能真正掌握并最终能够游刃有余,而优秀的源码可是说是提供了最完美的解决方案。

学习搭架构的思路

从做Android开发来说,每个项目最常用的就是网路库和图片库了。如果能从零设计这两个库,那么其他的架构都是大同小异了。

以网络库Volley为例,读完源码,基本能形成:

1

Request --> Dispatcher --> Cache --> HttpStack

这一套思路。其实再看其他的网路库都大同小异。我们自己实现,根据这个思路基本就足够了。

再以Glide为例,整个架构基本是由RequestManager、Engine、Cache、Target这几部分组成,其他的也是差不多的思路。

优质的库都是在大量试错和妥协后的结果,基本是用最合理的方式实现最终的需求,在设计类似的框架时,先借鉴,再改进,设计其他的架构差不多也是这么一套方法。

学习一些黑科技

这个就属于堆经验了。同样类型的库架构上大同小异,但是每个库又有它的独到之处,只有真正把源码读完,才能学习到有意思的地方。这部分只举例子,不具体分析:

  • Glide利用一个空Fragment的生命周期实现每个请求与所属上下文生命周期的绑定

  • RecyclerView不再像ListView那样缓存View,二是直接缓存ViewHolder,这是许多仿写ListView的人从没想到过的思路

  • Retrofit使用动态代理拿到注解的请求详情

  • OkHttp的责任链模式 虽然是个设计模式,但是这个思路太巧妙了

  • Picasso的磁盘缓存本质上是OkHttp的磁盘缓存!当时看到这部分源码是特别惊艳的,同时我也感受到了Square的工程师们对他们的全家桶的无比自信

这些有意思的设计细节我们不一定能用得到,但是能为我们解决平时的问题提供更多的思路,同时也能学到更多不常用的知识。

总结

除了这些提到的库,其他一些源码我也多少度过,只能说代码神奇就在这里,每个人的代码风格、设计思路都不一样,但是最终都能产出一个优质的开源框架,很多苦看起来架构差不多,但是内部实现又是千奇百怪,同一种模块似乎每种设计模式都能派上用场。读源码,抛去为了解决问题、为了提升技能的这些功利性的想法,只是体会这些强人的思路,已经是一种享受了吧。

阅读源码的半程总结-为什么要阅读源码

我工作时间并不长,阅读的源码也不够多,这篇文章只能说是算是对自己这方面的一个总结,或者更多的是从我工作和做Android这方面的角度分析问题。至于为什么是半程总结,因为以后有了新的感受和技能,肯定还要回头来更新。

为什么要读源码?我觉得其实很多人都没有答案。

我见过最多的,可能就是对一个函数的使用不清楚,Android完全开源,点进去看看这个方法干了啥,可能抛出什么异常,撑死了再看一下注释,这也就算是读过源码了。

可能是我自己现在做Android开发的原因?或者是现在编程语言和框架发展太快?好像我见过的许多人都热衷于学习新框架的用法,做一个项目就等同于推依赖库。我见过知乎的一个问题:现在android开发都会用到那些快速开发框架或者第三库?。去年的这个时候看到这个问题下面的回答我可能就是会心一笑,因为我也这么做,毕竟初级工程师嘛,哪考虑那么多?GitHub上的star数也能反映很大的问题,一个项目用个RxJava+Retrofit+MD+Dagger+MVP,当然,像OkHttp、Glide、ButterKnife这些已经是必备了,然后写一篇文章宣传下,star数就蹭蹭得涨,我之前闲的时候clone个几个项目看过代码,实话说代码质量真不敢恭维。把这几个库放在一个成熟项目的团队里让大家用,首先,你能保证API是Restful么?你能保证大家都能接受RxJava的学习曲线么,换句话说,学了RxJava的几个操作符,就真的明白什么是响应式编程了么?你能承担项目整体重构成MVP结构的风险么?这几个库都是现在Android开发很棒的库,都是很“潮”的东西,但是不客气的说,除了RxJava学习曲线比较抖,其他这些库现在都是傻瓜式使用,全都有完整的官方文档和Wiki,真的是要啥有啥,只学这些库的使用的话真的没有什么成本。

吐槽完毕,言归正传。我把读源码分为三种情况:为了修复bug被动阅读,为了技术选型去主动阅读,为了提升自己去阅读。

被动阅读源码

以下是本人上OkHttp的真实经历

被动就是现在在你的主导下,上了一个新依赖库,你在上线之前做了充分的工作,前期做了社区调研,了解了大家对这个库的各种看法,通读了wiki,甚至看了很多issue,接着在引入项目的时候做了极致的封装,保证与业务代码完全解耦,唯独没有读源代码,毕竟这是件费力不讨好的事儿。万事俱备,上线!然后,你从没有见过的各种bug就接踵而至,很多bug都Google不到,Wiki也不会说我们这个库有啥啥啥的毛病,万幸还有错误栈可以看,没办法了,锅是你的,看源代码虽然像便秘,也只能硬着头皮上啦!

这时候就开始被动读源码了。一般来说,大多数bug只要根据错误信息,看看是哪个函数抛出来的错误,再循着传递的参数找到底,问题差不多就能解决了。但是总有那种问题,看起来不是你用的库抛出来的,之前从来没出过,只有你的这个版本有,还特别多,别人不由得就怀疑是你的锅,即使是为了自证清白(一般都不清白),也得把问题的根源找到然后解决了。这是一个最痛苦的过程,对于一个影响全局的库来说,任何地方都有可能出问题,到这里,通读源码就是唯一的办法了,任何库都有妥协和脏代码,只有从这部分东西才能猜出问题出在哪里。

因为这部分问题的解释涉及到我们一部分核心业务逻辑,就不多讲了。只能说如果一个影响全局的库已经成功在一个项目了稳定运行多年,已经调试到没有问题的状态,除非一些强制客观因素必须换功能更强大的库,否则一定要谨慎。

主动阅读源码

以下是本人上Glide的真实经历

吸取了上面的教训,在换Glide的之前我主动通读了Glide的源代码,即便如此,我也没敢擅自动手。Android最怕的就是莫名其妙的OOM,而换图片加载库则可能会爆发大量的OOM,这时候读完代码也没用,只能用笨方法一步一步去检测内存问题。但是后来我们要全局支持gif格式,而UIL没有这个功能,也没法做扩展,这时候就只能上Glide了。

Glide相对于UIL是比较新的,功能也更多,读完源码之后也被它强大的扩展性震惊了。图片从发起请求到最终展示,真的是每一步都有接口可以重新实现。上线之后并没有预计的出现太多的问题,但是在中间做封装的时候有两个功能让读过的源码有了用武之地:

  • 一是UIL也是很厉害的,它实现了Picasso和Glide都没有做到的加载视频缩略图,只要传入视频路径,就能直接展示一张缩略图。读过Glide的源码之后,其实这个不算难事,Glide从源路径获取数据这部分是通过ModelLoader去做的,只要实现一个专门的ModelLoader,再结合SDK提供的ThumbnailUtil工具类,就可以获取到并加载视频缩略图了。

  • 二是我们要做一个全局的视频加载库,可以实现从下载到播放的过程,与图片加载库没有本质区别,还少了一步内存缓存。这部分就要关心Glide最终加载的过程了,看源码我们能知道into()方法里最终ImageView会被包装成一个Target来展示图片,那我们当然也可以重写Target来展示视频了,而且还充分利用了Glide的其他特性,比我们自己写一个视频加载框架要更省事也更强大。

在进行框架调研时,主动通读源码的好处是显而易见的,因为在封装的时候会尽量避开各种坑,在遇到坑时也能够根据框架的设计特性和扩展性进行解决或者规避问题。

为了学习而读源码

以上两种情况都属于为了具体需求而做的工作,很大程度是为了解决具体问题。接下来这种情况就是个人提升的关键了。

首先说从不主动读源码的坏处:一是容易养成一切靠Google、Stackoverfolw和GitHub的习惯,只会复制粘贴和调试,自己无法独立产出。二是你所处的环境里最厉害的人就是你的上限了,因为他写的代码是你能看到的代码的上限。

优秀的框架基本都是大神或者优质团队的代码精华,敢做开源项目的一般都是对框架功能和代码质量有极高信心的人,所以找一些流行的框架,通读源码,学习其中的细节和设计模式,对自己的日常工作肯定是有很大好处的。读这些顶级程序员写的代码,无形中也提升了自己的上限。只能说看这些优秀源码越多,越知道自己不能只停留在使用的层面,要想更进一步,读源码算是个捷径。

总结

说了这么多,无论是出于以上三种的哪一种动机,其实都不重要。如果对编程有所追求,想在自己这个方向有所建树,阅读源码肯定是不可或缺的一步。很多人平时停留在会用即可,不去深挖,想跳槽时又只能在简历上写些熟悉某些库的使用,谈到实现细节一问三不知,最后又嫌人家要求太高。其实我们现在做开发都明白,库的封装性在越来越高,学习成本越来越低,一般的库只学基本使用,可能就是一个小时的事情,而对原理的掌握才是与别人区分开的标志。知其然且知其所以然,才是区分牛人和码农的标志。另外,很多人停留在会用的阶段也与需求难度和软件的受众数量有关,但是在一个成熟的、日活百万甚至千万级的APP里,面对千奇百怪的需求,只是会用这个库,恐怕只会让你掉进坑里再也出不来了。

Picasso源码结构分析

基本概念

前一段时间复习了Glide的源码,而且这次做了文字整理,又被大神的思路震惊了一次。正好赶上清明假,就把用起来特别相似的,出自JakeWarton大神的Picasso的源码也分析一下,同时跟Glide也做个简单的比较。

Picasso的官网在http://square.github.io/picasso/
用法跟Glide基本一致,就不用多废话介绍了,毕竟已经很有名了。这篇分析基于Picasso 2.5.2

基本流程

还是按照规矩先上图:

看起来有点绕,因为Picasso不像Glide那样类和接口特别多,而是用很少的类实现了强大的功能,那么也就不可避免的有的类承担了多种工作。接下来我们就来分析这些类的作用。

源码分析

我们还是从最基本的Picasso.with(context).load(url).into(view)来分析吧。首先看第一步:

1
2
3
4
5
6
7
8
9
10
11
12
13
14

public static Picasso with(@NonNull Context context) {
if (context == null) {
throw new IllegalArgumentException("context == null");
}
if (singleton == null) {
synchronized (Picasso.class) {
if (singleton == null) {
singleton = new Builder(context).build();
}
}
}
return singleton;
}

with(context)方法本质上什么都没做,Picasso只支持一种上下文,它不管这是ApplicationContext还是Activity,然后返回了一个单例。那我们再看load(url)方法:

1
2
3
4

public RequestCreator load(@Nullable Uri uri) {
return new RequestCreator(this, uri, 0);
}

这里就引出我们的第二个角色了,RequestCreator,类如其名,这个类用来根据传入的参数构建一个请求,注意,它会持有Picasso单例的引用,into(view)方法当然也在里面了,继续看源码:

1
2
3
4
5
6
7
8
9
10
11
12
13
14
15
16
17
18
19
20
21
22
23
24
25
26
27
28
29
30
31
32
33
34
35
36
37
38
39
40
41
42
43
44
45
46
47
48
49
50
51
52
53
54
55
56
57
58
59
60
61
62
63
64
65
66
67
68
69
70
71
72
73
74
75
76
77
78
79
80
81
82
83
84
85
86
87
88
89
90
91
92
93
94
95
96
97
98
99
100
101
102

private final Request.Builder data;

RequestCreator(Picasso picasso, Uri uri, int resourceId) {
if (picasso.shutdown) {
throw new IllegalStateException(
"Picasso instance already shut down. Cannot submit new requests.");
}
this.picasso = picasso;
this.data = new Request.Builder(uri, resourceId, picasso.defaultBitmapConfig);
}

public void into(ImageView target) {
into(target, null);
}

public void into(ImageView target, Callback callback) {
long started = System.nanoTime();
checkMain();

if (target == null) {
throw new IllegalArgumentException("Target must not be null.");
}

if (!data.hasImage()) {
picasso.cancelRequest(target);
if (setPlaceholder) {
setPlaceholder(target, getPlaceholderDrawable());
}
return;
}

if (deferred) {
if (data.hasSize()) {
throw new IllegalStateException("Fit cannot be used with resize.");
}
int width = target.getWidth();
int height = target.getHeight();
if (width == 0 || height == 0 || target.isLayoutRequested()) {
if (setPlaceholder) {
setPlaceholder(target, getPlaceholderDrawable());
}
picasso.defer(target, new DeferredRequestCreator(this, target, callback));
return;
}
data.resize(width, height);
}

Request request = createRequest(started);
String requestKey = createKey(request);

if (shouldReadFromMemoryCache(memoryPolicy)) {
Bitmap bitmap = picasso.quickMemoryCacheCheck(requestKey);
if (bitmap != null) {
picasso.cancelRequest(target);
setBitmap(target, picasso.context, bitmap, MEMORY, noFade, picasso.indicatorsEnabled);
if (picasso.loggingEnabled) {
log(OWNER_MAIN, VERB_COMPLETED, request.plainId(), "from " + MEMORY);
}
if (callback != null) {
callback.onSuccess();
}
return;
}
}

if (setPlaceholder) {
setPlaceholder(target, getPlaceholderDrawable());
}

Action action =
new ImageViewAction(picasso, target, request, memoryPolicy, networkPolicy, errorResId,
errorDrawable, requestKey, tag, callback, noFade);

picasso.enqueueAndSubmit(action);
}

private Request createRequest(long started) {
int id = nextId.getAndIncrement();

Request request = data.build();
request.id = id;
request.started = started;

boolean loggingEnabled = picasso.loggingEnabled;
if (loggingEnabled) {
log(OWNER_MAIN, VERB_CREATED, request.plainId(), request.toString());
}

Request transformed = picasso.transformRequest(request);
if (transformed != request) {
// If the request was changed, copy over the id and timestamp from the original.
transformed.id = id;
transformed.started = started;

if (loggingEnabled) {
log(OWNER_MAIN, VERB_CHANGED, transformed.logId(), "into " + transformed);
}
}

return transformed;
}

这部分代码就有干货了。在into方法里,我们能看到在一连串检查线程,获取尺寸等等一系列准备工作之后,Request终于出现了,它由内部的Builder构建出来(具体细节就不在这里分析了,与多数框架的Request没有大的区别,都只负责携带信息),然后它再加上一个外界传入的请求需要的各种各样的配置信息,就构成了干实事的Action。这个Action内部实现先不看,这时候刚才传入的Picasso对象起作用了,看Picasso里的enqueueAndSubmit(action)方法干了什么:

1
2
3
4
5
6
7
8
9
10
11
12
13
14
15
16

final Dispatcher dispatcher;

void enqueueAndSubmit(Action action) {
Object target = action.getTarget();
if (target != null && targetToAction.get(target) != action) {
// This will also check we are on the main thread.
cancelExistingRequest(target);
targetToAction.put(target, action);
}
submit(action);
}

void submit(Action action) {
dispatcher.dispatchSubmit(action);
}

又一个重要的角色出现了,Dispatcher。在很多框架里都有Dispatcher这个概念,比如赫赫有名的VolleyDispatcher不用看,都知道是一个管理所有请求的调度器,顺着这个方法我们找到了Dispatcher中实际的实现类performSubmit:

1
2
3
4
5
6
7
8
9
10
11
12
13
14
15
16
17
18
19
20
21
22
23
24
25
26
27
28
29
30
31
32
33
34
35
36
37
38
39
40
41
42
43
44
45
46
47
48
49
50
51
52
53
54

final ExecutorService service;

void performSubmit(Action action, boolean dismissFailed) {
if (pausedTags.contains(action.getTag())) {
pausedActions.put(action.getTarget(), action);
if (action.getPicasso().loggingEnabled) {
log(OWNER_DISPATCHER, VERB_PAUSED, action.request.logId(),
"because tag '" + action.getTag() + "' is paused");
}
return;
}

BitmapHunter hunter = hunterMap.get(action.getKey());
if (hunter != null) {
hunter.attach(action);
return;
}

if (service.isShutdown()) {
if (action.getPicasso().loggingEnabled) {
log(OWNER_DISPATCHER, VERB_IGNORED, action.request.logId(), "because shut down");
}
return;
}

hunter = forRequest(action.getPicasso(), this, cache, stats, action);
hunter.future = service.submit(hunter);
hunterMap.put(action.getKey(), hunter);
if (dismissFailed) {
failedActions.remove(action.getTarget());
}

if (action.getPicasso().loggingEnabled) {
log(OWNER_DISPATCHER, VERB_ENQUEUED, action.request.logId());
}
}

static BitmapHunter forRequest(Picasso picasso, Dispatcher dispatcher, Cache cache, Stats stats,
Action action)
{

Request request = action.getRequest();
List<RequestHandler> requestHandlers = picasso.getRequestHandlers();

// Index-based loop to avoid allocating an iterator.
//noinspection ForLoopReplaceableByForEach
for (int i = 0, count = requestHandlers.size(); i < count; i++) {
RequestHandler requestHandler = requestHandlers.get(i);
if (requestHandler.canHandleRequest(request)) {
return new BitmapHunter(picasso, dispatcher, cache, stats, action, requestHandler);
}
}

return new BitmapHunter(picasso, dispatcher, cache, stats, action, ERRORING_HANDLER);
}

又是ExecutorService,而且又一个关键角色也出现了–BitmapHunter大概这个类名也表明了Picasso只做纯图片加载的意图。首先可以肯定的是BitmapHunter实现了Runnable接口,从代码里我们可以看到它携带者ActionCache等一众小弟,注意,它这时候也持有Picasso和当前Dispatcher的实例,然后去工作线程干活去了。接下来当然是看BitmapHunter里的run()方法了:

1
2
3
4
5
6
7
8
9
10
11
12
13
14
15
16
17
18
19
20
21
22
23
24
25
26
27
28
29
30
31
32
33
34
35
36
37
38
39
40
41
42
43
44
45
46
47
48
49
50
51
52
53
54
55
56
57
58
59
60
61
62
63
64
65
66
67
68
69
70
71
72
73
74
75
76
77
78
79
80
81
82
83
84
85
86
87
88
89
90
91
92
93
94
95
96
97
98
99
100
101
102
103

@Override public void run() {
try {
updateThreadName(data);

if (picasso.loggingEnabled) {
log(OWNER_HUNTER, VERB_EXECUTING, getLogIdsForHunter(this));
}

result = hunt();

if (result == null) {
dispatcher.dispatchFailed(this);
} else {
dispatcher.dispatchComplete(this);
}
} catch (NetworkRequestHandler.ResponseException e) {
if (!NetworkPolicy.isOfflineOnly(e.networkPolicy) || e.code != 504) {
exception = e;
}
dispatcher.dispatchFailed(this);
} catch (IOException e) {
exception = e;
dispatcher.dispatchRetry(this);
} catch (OutOfMemoryError e) {
StringWriter writer = new StringWriter();
stats.createSnapshot().dump(new PrintWriter(writer));
exception = new RuntimeException(writer.toString(), e);
dispatcher.dispatchFailed(this);
} catch (Exception e) {
exception = e;
dispatcher.dispatchFailed(this);
} finally {
Thread.currentThread().setName(Utils.THREAD_IDLE_NAME);
}
}


Bitmap hunt() throws IOException {
Bitmap bitmap = null;

if (shouldReadFromMemoryCache(memoryPolicy)) {
bitmap = cache.get(key);
if (bitmap != null) {
stats.dispatchCacheHit();
loadedFrom = MEMORY;
if (picasso.loggingEnabled) {
log(OWNER_HUNTER, VERB_DECODED, data.logId(), "from cache");
}
return bitmap;
}
}

networkPolicy = retryCount == 0 ? NetworkPolicy.OFFLINE.index : networkPolicy;
RequestHandler.Result result = requestHandler.load(data, networkPolicy);
if (result != null) {
loadedFrom = result.getLoadedFrom();
exifOrientation = result.getExifOrientation();
bitmap = result.getBitmap();

// If there was no Bitmap then we need to decode it from the stream.
if (bitmap == null) {
Source source = result.getSource();
try {
bitmap = decodeStream(source, data);
} finally {
try {
//noinspection ConstantConditions If bitmap is null then source is guranteed non-null.
source.close();
} catch (IOException ignored) {
}
}
}
}

if (bitmap != null) {
if (picasso.loggingEnabled) {
log(OWNER_HUNTER, VERB_DECODED, data.logId());
}
stats.dispatchBitmapDecoded(bitmap);
if (data.needsTransformation() || exifOrientation != 0) {
synchronized (DECODE_LOCK) {
if (data.needsMatrixTransform() || exifOrientation != 0) {
bitmap = transformResult(data, bitmap, exifOrientation);
if (picasso.loggingEnabled) {
log(OWNER_HUNTER, VERB_TRANSFORMED, data.logId());
}
}
if (data.hasCustomTransformations()) {
bitmap = applyCustomTransformations(data.transformations, bitmap);
if (picasso.loggingEnabled) {
log(OWNER_HUNTER, VERB_TRANSFORMED, data.logId(), "from custom transformations");
}
}
}
if (bitmap != null) {
stats.dispatchBitmapTransformed(bitmap);
}
}
}

return bitmap;
}

run()里面,其实就是把结果回调给持有的Dispatcher,让它对结果做处理。关键是hunt(),在这里,它走了从内存缓存取数据,未命中则构建RequestHandler从数据源取数据的过程,然后经过一系列处理之后,返回最终的Bitmap对象。RequestHandler的作用稍后讲。BitmapHunter名不虚传,这时候Bitmap已经拿到了,该把它又返回上层了。然后我们就能看到在run()方法里各种情况下执行的Dispatcher不同的回调方法。我们只看成功的情况:

1
2
3
4
5
6
7
8
9
10
11
12
13
14
15
16
17
18
19
20
21
22
23
24
25
26
27
28

void performComplete(BitmapHunter hunter) {
if (shouldWriteToMemoryCache(hunter.getMemoryPolicy())) {
cache.set(hunter.getKey(), hunter.getResult());
}
hunterMap.remove(hunter.getKey());
batch(hunter);
if (hunter.getPicasso().loggingEnabled) {
log(OWNER_DISPATCHER, VERB_BATCHED, getLogIdsForHunter(hunter), "for completion");
}
}

private void batch(BitmapHunter hunter) {
if (hunter.isCancelled()) {
return;
}
batch.add(hunter);
if (!handler.hasMessages(HUNTER_DELAY_NEXT_BATCH)) {
handler.sendEmptyMessageDelayed(HUNTER_DELAY_NEXT_BATCH, BATCH_DELAY);
}
}

void performBatchComplete() {
List<BitmapHunter> copy = new ArrayList<>(batch);
batch.clear();
mainThreadHandler.sendMessage(mainThreadHandler.obtainMessage(HUNTER_BATCH_COMPLETE, copy));
logBatch(copy);
}

被处理完的Bitmap对应的BitmapHunter被一步步向上传递,然后通过一个handlerThread将结果又传回给了Picasso:

1
2
3
4
5
6
7
8
9
10
11
12
13
14
15
16
17
18
19
20
21
22
23
24
25
26
27
28
29
30
31
32
33
34
35
36
37
38
39
40
41
42
43
44
45
46
47
48
49
50
51
52
53
54
55
56
57
58
59
60
61
62
63
64
65
66
      case HUNTER_BATCH_COMPLETE: {
@SuppressWarnings("unchecked") List<BitmapHunter> batch = (List<BitmapHunter>) msg.obj;
//noinspection ForLoopReplaceableByForEach
for (int i = 0, n = batch.size(); i < n; i++) {
BitmapHunter hunter = batch.get(i);
hunter.picasso.complete(hunter);
}
break;
}


void complete(BitmapHunter hunter) {
Action single = hunter.getAction();
List<Action> joined = hunter.getActions();

boolean hasMultiple = joined != null && !joined.isEmpty();
boolean shouldDeliver = single != null || hasMultiple;

if (!shouldDeliver) {
return;
}

Uri uri = hunter.getData().uri;
Exception exception = hunter.getException();
Bitmap result = hunter.getResult();
LoadedFrom from = hunter.getLoadedFrom();

if (single != null) {
deliverAction(result, from, single, exception);
}

if (hasMultiple) {
//noinspection ForLoopReplaceableByForEach
for (int i = 0, n = joined.size(); i < n; i++) {
Action join = joined.get(i);
deliverAction(result, from, join, exception);
}
}

if (listener != null && exception != null) {
listener.onImageLoadFailed(this, uri, exception);
}
}

private void deliverAction(Bitmap result, LoadedFrom from, Action action, Exception e) {
if (action.isCancelled()) {
return;
}
if (!action.willReplay()) {
targetToAction.remove(action.getTarget());
}
if (result != null) {
if (from == null) {
throw new AssertionError("LoadedFrom cannot be null.");
}
action.complete(result, from);
if (loggingEnabled) {
log(OWNER_MAIN, VERB_COMPLETED, action.request.logId(), "from " + from);
}
} else {
action.error(e);
if (loggingEnabled) {
log(OWNER_MAIN, VERB_ERRORED, action.request.logId(), e.getMessage());
}
}
}

最终结果又到了Picasso里面,在这里,它把最终结果传给ActionAction是一个抽象方法,我们看最典型的ImageViewAction的实现:

1
2
3
4
5
6
7
8
9
10
11
12
13
14
15
16
17
18
19
20

@Override public void complete(Bitmap result, Picasso.LoadedFrom from) {
if (result == null) {
throw new AssertionError(
String.format("Attempted to complete action with no result!\n%s", this));
}

ImageView target = this.target.get();
if (target == null) {
return;
}

Context context = picasso.context;
boolean indicatorsEnabled = picasso.indicatorsEnabled;
PicassoDrawable.setBitmap(target, context, result, from, noFade, indicatorsEnabled);

if (callback != null) {
callback.onSuccess();
}
}

那么一个完整的加载过程在这里就结束了。

Glide的异同

  • 说实话我能想到的同也就是使用方法类似了,另外大的结构也有类似的地方,比如GlideModelLoaderEngineTarget分别对应PicassoRequestHandlerDispatcherAction,但是如果从零设计一个图片框架的话,应该都会有这些部分。

  • 不同的地方,其实就是设计思路的不同。Glide的功能强大,不仅可以加载一般的图片,也能加载gif、视频,因此具备极致的扩展性,几乎每个组件是一个接口可供外界重新实现,另外它宣传具有极致的滑动流畅性,因此在内存缓存上做了很大的文章,一个完整请求会有四级缓存,其中设计了BitmapPool这个神器来提升列表滑动的体验。

  • Picasso,是一个纯粹的轻量级图片框架。它只能处理Bitmap,也只愿意处理它。在Picasso的issues里很多人都想要更多的功能,得到的答复都是Picasso目前的目标均已实现。它比Glide轻数倍,甚至没有分包,而且扩展性并不强,只能说在加载图片上有一定的可定制性。

总结

Picasso的源码很好读,没有Glide那么多绕来绕去的抽象方法和接口,读完Glide再来读Picasso完全就是享受,它比Glide更轻,能够满足绝大部分场景的图片加载,因此也是很成功的图片加载框架。Picasso的扩展性没那么强,另外它强依赖于OkHttp,甚至磁盘缓存都是通过OkHttp的磁盘缓存做的,可见Square对自己全家桶的自信程度。只能说这个库的目标就是Square全家桶的使用者,毕竟现在哪个新项目不会用OkHttp呢?

但是!再轻的库,麻烦还是分个包好不好···各种各样的类放在一个包里,强迫症有点受不了···

Glide源码分析-缓存

基本概念

每一个优秀的图片图片框架都会有完善的缓存管理机制,Glide当然不例外。这一部分就是分析它的缓存相关模块。流程图就不需要画了,缓存的本质无非就是putget,而且Glide的所有缓存的实现都是Lru,与我们常见的LruCache并没有本质区别,所以我们只分析Glide的缓存思想和优化工作。

相关类的介绍

Glide的缓存分为两大部分,一类是常规的内存和磁盘缓存,另一类是Glide独有的BitmapPool缓存。

  • MemoryCache: 传统的内存缓存接口
  • activeResources: 在我们之前分析Engine时提到过的一个弱引用为值得Map,作为第二层内存缓存
  • DishCache: 传统的磁盘缓存接口
  • BitmapPool: Bitmap池接口,用于避免反复创建相同尺寸和属性的Bitmap而消耗性能

源码分析

Glide的缓存机制有两类,我们先分析比较传统的一类,也就是大家都会用到的内存缓存和磁盘缓存。在我们之前分析过的Engineload()方法代码里,我们能看到内存缓存的身影:

1
2
3
4
5
6
7
8
9
10
11
12
13
14
15
16
17
18
19
20
21
22
23
24
25
26
27
28
29
30
31
32
33
34
35
36
37
38
39
40
41
42
43
44
45
46
47
48
49
50
51
52

public <T, Z, R> LoadStatus load(Key signature, int width, int height, DataFetcher<T> fetcher,
DataLoadProvider<T, Z> loadProvider, Transformation<Z> transformation, ResourceTranscoder<Z, R> transcoder,
Priority priority, boolean isMemoryCacheable, DiskCacheStrategy diskCacheStrategy, ResourceCallback cb)
{


EngineResource<?> cached = loadFromCache(key, isMemoryCacheable);
if (cached != null) {
cb.onResourceReady(cached);
if (Log.isLoggable(TAG, Log.VERBOSE)) {
logWithTimeAndKey("Loaded resource from cache", startTime, key);
}
return null;
}

EngineResource<?> active = loadFromActiveResources(key, isMemoryCacheable);
if (active != null) {
cb.onResourceReady(active);
if (Log.isLoggable(TAG, Log.VERBOSE)) {
logWithTimeAndKey("Loaded resource from active resources", startTime, key);
}
return null;
}
}

private EngineResource<?> loadFromCache(Key key, boolean isMemoryCacheable) {
if (!isMemoryCacheable) {
return null;
}

EngineResource<?> cached = getEngineResourceFromCache(key);
if (cached != null) {
cached.acquire();
activeResources.put(key, new ResourceWeakReference(key, cached, getReferenceQueue()));
}
return cached;
}

private EngineResource<?> getEngineResourceFromCache(Key key) {
Resource<?> cached = cache.remove(key);

final EngineResource result;
if (cached == null) {
result = null;
} else if (cached instanceof EngineResource) {
// Save an object allocation if we've cached an EngineResource (the typical case).
result = (EngineResource) cached;
} else {
result = new EngineResource(cached, true /*isCacheable*/);
}
return result;
}

我们由之前的分析可以知道,在真正发起一个EngineRunnable请求之前,会先从内存缓存和activeResources里尝试取数据,内存缓存其实不用多做分析,与我们平时用的没有本质区别。关键是activeResources:

1
2
3
4
5
6
7
8
9
10
11
12
13
14
15
16
17
18
19
20
21
22
23
24
25
26
27
28
29
30
31
32
33
34
35
36
37
38
39
40
41
42
43
44
45
46
47

private final Map<Key, WeakReference<EngineResource<?>>> activeResources;

private EngineResource<?> loadFromActiveResources(Key key, boolean isMemoryCacheable) {
if (!isMemoryCacheable) {
return null;
}

EngineResource<?> active = null;
WeakReference<EngineResource<?>> activeRef = activeResources.get(key);
if (activeRef != null) {
active = activeRef.get();
if (active != null) {
active.acquire();
} else {
activeResources.remove(key);
}
}
return active;
}

private EngineResource<?> loadFromCache(Key key, boolean isMemoryCacheable) {
if (!isMemoryCacheable) {
return null;
}

EngineResource<?> cached = getEngineResourceFromCache(key);
if (cached != null) {
cached.acquire();
activeResources.put(key, new ResourceWeakReference(key, cached, getReferenceQueue()));
}
return cached;
}

public void onEngineJobComplete(Key key, EngineResource<?> resource) {
Util.assertMainThread();
// A null resource indicates that the load failed, usually due to an exception.
if (resource != null) {
resource.setResourceListener(key, this);

if (resource.isCacheable()) {
activeResources.put(key, new ResourceWeakReference(key, resource, getReferenceQueue()));
}
}
// TODO: should this check that the engine job is still current?
jobs.remove(key);
}

activeResources是一个以弱引用Resource为值的Map,只要这次请求获取到数据时,它都会将结果缓存进去,作为第二级缓存备用。比一般内存缓存额外多一级缓存的意义在于,当内存不足时清理内存缓存中的资源时,不会对使用中的Resource造成影响。

而磁盘缓存我们在上一部分分析的时候已经分析过了,在一个DecodeJob中,会首先从磁盘缓存中获取数据;如果没有命中,则从数据源取到数据之后会写入磁盘缓存备用。
通过以上的逻辑,Glide就实现了一个传统的缓存结构。但是Glide之所以在推出的时候,宣传的是它在列表里表现的”丝般顺滑”,主要还是源于它的BitmapPool设计。我们首先看下BitmapPool的代码:

1
2
3
4
5
6
7
8
9
10
11
12
13
14
15
16
17
18
19
20
21
22
23
24
25
26
27
28
29
30
31
32
33
34
35
36
37
38
39
40
41
42
43
44
45
46
47
48
49
50
51
52
53
54
55
56
57
58
59
60
61
62
63
64
65
66
67
68
69
70
71
72
73
74
75
76
77
78
79
80
81
82
83
84
85
86
87
88
89
90
91
92
93
94
95
96
97
98
99
100
101
102
103
104
105
106
107
108
109
110
111
112
113
114
115
116
117
118
119
120
121
122
123
124
125
126
127
128
129
130
131
132
133
134
135
136
137
138
139
140
141
142
143
144
145
146
147
148
149
150
151
152
153

public class LruBitmapPool implements BitmapPool {
private static final String TAG = "LruBitmapPool";
private static final Bitmap.Config DEFAULT_CONFIG = Bitmap.Config.ARGB_8888;

private final LruPoolStrategy strategy;
private final Set<Bitmap.Config> allowedConfigs;
private final int initialMaxSize;
private final BitmapTracker tracker;

private int maxSize;
private int currentSize;
private int hits;
private int misses;
private int puts;
private int evictions;

// Exposed for testing only.
LruBitmapPool(int maxSize, LruPoolStrategy strategy, Set<Bitmap.Config> allowedConfigs) {
this.initialMaxSize = maxSize;
this.maxSize = maxSize;
this.strategy = strategy;
this.allowedConfigs = allowedConfigs;
this.tracker = new NullBitmapTracker();
}

/**
* Constructor for LruBitmapPool.
*
* @param maxSize The initial maximum size of the pool in bytes.
*/

public LruBitmapPool(int maxSize) {
this(maxSize, getDefaultStrategy(), getDefaultAllowedConfigs());
}

/**
* Constructor for LruBitmapPool.
*
* @param maxSize The initial maximum size of the pool in bytes.
* @param allowedConfigs A white listed set of {@link android.graphics.Bitmap.Config} that are allowed to be put
* into the pool. Configs not in the allowed set will be rejected.
*/

public LruBitmapPool(int maxSize, Set<Bitmap.Config> allowedConfigs) {
this(maxSize, getDefaultStrategy(), allowedConfigs);
}

@Override
public int getMaxSize() {
return maxSize;
}

@Override
public synchronized void setSizeMultiplier(float sizeMultiplier) {
maxSize = Math.round(initialMaxSize * sizeMultiplier);
evict();
}

@Override
public synchronized boolean put(Bitmap bitmap) {
if (bitmap == null) {
throw new NullPointerException("Bitmap must not be null");
}
if (!bitmap.isMutable() || strategy.getSize(bitmap) > maxSize || !allowedConfigs.contains(bitmap.getConfig())) {
if (Log.isLoggable(TAG, Log.VERBOSE)) {
Log.v(TAG, "Reject bitmap from pool"
+ ", bitmap: " + strategy.logBitmap(bitmap)
+ ", is mutable: " + bitmap.isMutable()
+ ", is allowed config: " + allowedConfigs.contains(bitmap.getConfig()));
}
return false;
}

final int size = strategy.getSize(bitmap);
strategy.put(bitmap);
tracker.add(bitmap);

puts++;
currentSize += size;

if (Log.isLoggable(TAG, Log.VERBOSE)) {
Log.v(TAG, "Put bitmap in pool=" + strategy.logBitmap(bitmap));
}
dump();

evict();
return true;
}

private void evict() {
trimToSize(maxSize);
}

@Override
public synchronized Bitmap get(int width, int height, Bitmap.Config config) {
Bitmap result = getDirty(width, height, config);
if (result != null) {
// Bitmaps in the pool contain random data that in some cases must be cleared for an image to be rendered
// correctly. we shouldn't force all consumers to independently erase the contents individually, so we do so
// here. See issue #131.
result.eraseColor(Color.TRANSPARENT);
}

return result;
}

@TargetApi(Build.VERSION_CODES.HONEYCOMB_MR1)
@Override
public synchronized Bitmap getDirty(int width, int height, Bitmap.Config config) {
// Config will be null for non public config types, which can lead to transformations naively passing in
// null as the requested config here. See issue #194.
final Bitmap result = strategy.get(width, height, config != null ? config : DEFAULT_CONFIG);
if (result == null) {
if (Log.isLoggable(TAG, Log.DEBUG)) {
Log.d(TAG, "Missing bitmap=" + strategy.logBitmap(width, height, config));
}
misses++;
} else {
hits++;
currentSize -= strategy.getSize(result);
tracker.remove(result);
if (Build.VERSION.SDK_INT >= Build.VERSION_CODES.HONEYCOMB_MR1) {
result.setHasAlpha(true);
}
}
if (Log.isLoggable(TAG, Log.VERBOSE)) {
Log.v(TAG, "Get bitmap=" + strategy.logBitmap(width, height, config));
}
dump();

return result;
}

@Override
public void clearMemory() {
if (Log.isLoggable(TAG, Log.DEBUG)) {
Log.d(TAG, "clearMemory");
}
trimToSize(0);
}

@SuppressLint("InlinedApi")
@Override
public void trimMemory(int level) {
if (Log.isLoggable(TAG, Log.DEBUG)) {
Log.d(TAG, "trimMemory, level=" + level);
}
if (level >= android.content.ComponentCallbacks2.TRIM_MEMORY_MODERATE) {
clearMemory();
} else if (level >= android.content.ComponentCallbacks2.TRIM_MEMORY_BACKGROUND) {
trimToSize(maxSize / 2);
}
}
}

上面是BitmapPool的主要实现类LruBitmapPool关键的一部分代码。我们可以看到在put()方法里,并没有常见的key值,key是完全根据Bitmap的尺寸和属性生成的。在get()方法里,也是通过传入尺寸和属性获取对象的。其实不需要看BitmapPool是怎么使用的,光看这部分其实就可以知道它的设计思路了。在Andorid的ListViewRecyclerView中,如果item里有图片的话,快速滑动的过程中无法避免不断创建新的Bitmap对象供item使用,在ListViewRecyclerViewView是可复用的,Bitmap并不是,而在Android中Bitmap的创建是一件非常耗费自愿的事情,所有因此衍生出这个BitmapPool,当已经有尺寸和属性相同的Bitmap被创建出来后就不用再创建新的了,直接使用之前的就行。我们可以看某个地方使用BitmapPool的代码:

1
2
3
4
5
6
7
8
9
10
11
12
13
14
15
16
17
18
19
20
21
22
23
24
25
26
27
28
29

public class CenterCrop extends BitmapTransformation {

public CenterCrop(Context context) {
super(context);
}

public CenterCrop(BitmapPool bitmapPool) {
super(bitmapPool);
}

// Bitmap doesn't implement equals, so == and .equals are equivalent here.
@SuppressWarnings("PMD.CompareObjectsWithEquals")
@Override
protected Bitmap transform(BitmapPool pool, Bitmap toTransform, int outWidth, int outHeight) {
final Bitmap toReuse = pool.get(outWidth, outHeight, toTransform.getConfig() != null
? toTransform.getConfig() : Bitmap.Config.ARGB_8888);
Bitmap transformed = TransformationUtils.centerCrop(toReuse, toTransform, outWidth, outHeight);
if (toReuse != null && toReuse != transformed && !pool.put(toReuse)) {
toReuse.recycle();
}
return transformed;
}

@Override
public String getId() {
return "CenterCrop.com.bumptech.glide.load.resource.bitmap";
}
}

在用于生成centerCrop效果的Transformation里,我们能看到在transform方法里就传入了全局的BitmapPool,在构建目标的Bitmap时,会从BitmapPool中取对应的Bitmap以复用。这样就避免了每次都必须创建一个新的Bitmap进而消耗太多资源。

总结

Glide的缓存机制的优秀之处,一是BitmapPool机制,二是activeResources这个第二级缓存增加了内存缓存的命中率。Glide通过缓存机制达到了它所宣传的顺滑的特点。当然,BitmapPool肯定会占用部分内存,但是与提升体验相比瑕不掩瑜。如果某些低端机型出现内存不够的情况,可能需要手动监听内存使用情况并及时调用Glide.get(context).clearMemory()

Glide的源码分析基本就是这样,但是还是建议完整地阅读源码,因为分析只能了解Glide整体的结构,对debug有帮助,但是如果想完全发挥Glide的巨大潜能,还是应该阅读源码并结合官方文档,充分利用ModelLoaderTransformation以及Target这些可扩展的接口打造适合自己项目的框架。

Glide源码分析-具体请求

基本概念

上一部分我们分析了Glide的生命周期管理,到这一步时RequestManager已经构建完成了,接下来就该依照外界传入的配置构建具体Request发出加载请求了,也就是终于到了真正干活的地方了。Glide的优秀之处(也是为什么有那么多代码)的原因就是在这个部分扩展性很强,你甚至可以把Glide完全改造,包括具体的网络请求、请求的数据类型、对最终数据的操作都可以重写,只让Glide处理线程调度和成名周期绑定,而不只是加载图片和gif。

请求流程图

具体请求类图

相关类的介绍

  • RequestManager:用于接受外界传入的uri根据数据类型生成GenericRequestBuilder
  • GenericRequestBuilder:用于构建具体用于数据请求的Request
  • Request:携带一个具体请求相关的所有信息
  • Engine:当Request被执行时,有Engine负责管理总体的数据请求流程
  • EngineRunnable: 实现了Runnable,有这个类持有EngineJobDecodeJob在子线程进行原始数据请求
  • EngineJob: 负责开启数据请求及将结果通过EngineJobListenerResourceCallback回调给EngineJob和具体的Request
  • DecodeJob: 真正执行数据请求的类,向外界暴露从缓存中请求和从数据源请求原始数据的方法

源码分析

与之前一样,这个过程只看只看类的作用只能看个大概,还是需要搬出来源码解释问题。我们以Glide.with(context).load(url).into(imageview)为例,首先看RequestManager中的相关方法:

1
2
3
4
5
6
7
8
9
10
11
12
13
14
15
16
17
18
19
20
21
22
23
24

public DrawableTypeRequest<String> load(String string) {
return (DrawableTypeRequest<String>) fromString().load(string);
}

public DrawableTypeRequest<String> fromString() {
return loadGeneric(String.class);
}

private <T> DrawableTypeRequest<T> loadGeneric(Class<T> modelClass) {
//构建传入的数据类型对应的ModelLoader
ModelLoader<T, InputStream> streamModelLoader = Glide.buildStreamModelLoader(modelClass, context);
ModelLoader<T, ParcelFileDescriptor> fileDescriptorModelLoader =
Glide.buildFileDescriptorModelLoader(modelClass, context);
if (modelClass != null && streamModelLoader == null && fileDescriptorModelLoader == null) {
throw new IllegalArgumentException("Unknown type " + modelClass + ". You must provide a Model of a type for"
+ " which there is a registered ModelLoader, if you are using a custom model, you must first call"
+ " Glide#register with a ModelLoaderFactory for your custom model class");
}

return optionsApplier.apply(
new DrawableTypeRequest<T>(modelClass, streamModelLoader, fileDescriptorModelLoader, context,
glide, requestTracker, lifecycle, optionsApplier));
}

这部分源码比较抽象,但是做的事情并不复杂,就是拿到传入的数据后,根据数据类型构建一个ModelLoader,这个ModelLoader的作用后面讲。然后再拿着这个ModelLoader构建一个DrawableTypeRequest,这个DrawableTypeRequestGenericRequestBuilder的子类,然后看它的相关源码:

1
2
3
4
5
6

public GenericRequestBuilder<ModelType, DataType, ResourceType, TranscodeType> load(ModelType model) {
this.model = model;
isModelSet = true;
return this;
}

尴尬,好像是一个建造者模式,只是传入了数据,并没有进行操作,但是也可以知道,Glide.with(context).load(url).into(imageview)这个完整请求的最后一步,into()方法肯定也在这个类里面,那我们继续看相关源码:

1
2
3
4
5
6
7
8
9
10
11
12
13
14
15
16
17
18
19
20
21
22
23
24
25
26
27
28
29
30
31
32
33
34
35
36
37
38
39
40
41
42
43
44
45
46
47
48

public Target<TranscodeType> into(ImageView view) {
Util.assertMainThread();
if (view == null) {
throw new IllegalArgumentException("You must pass in a non null View");
}

if (!isTransformationSet && view.getScaleType() != null) {
switch (view.getScaleType()) {
case CENTER_CROP:
applyCenterCrop();
break;
case FIT_CENTER:
case FIT_START:
case FIT_END:
applyFitCenter();
break;
//$CASES-OMITTED$
default:
// Do nothing.
}
}
return into(glide.buildImageViewTarget(view, transcodeClass));
}

public <Y extends Target<TranscodeType>> Y into(Y target) {
Util.assertMainThread();
if (target == null) {
throw new IllegalArgumentException("You must pass in a non null Target");
}
if (!isModelSet) {
throw new IllegalArgumentException("You must first set a model (try #load())");
}

Request previous = target.getRequest();

if (previous != null) {
previous.clear();
requestTracker.removeRequest(previous);
previous.recycle();
}

Request request = buildRequest(target);
target.setRequest(request);
lifecycle.addListener(target);
requestTracker.runRequest(request);
return target;
}

首先是into(imageview)这个方法,无视无用信息,关键代码只有最后一句,执行的是into(target)方法。然后我们继续看这个方法,这时候很明显了,在into(target)执行时,会构建一个Request,然后被执行runRequest。再看runRequest方法的源码:

1
2
3
4
5
6
7
8
9

public void runRequest(Request request) {
requests.add(request);
if (!isPaused) {
request.begin();
} else {
pendingRequests.add(request);
}
}

很简单,本质上就是执行Requestbegin()方法。Request是一个接口,我们看它的主要实现类GenericRequest的源码:

1
2
3
4
5
6
7
8
9
10
11
12
13
14
15
16
17
18
19
20
21
22
23
24
25
26
27
28
29
30
31
32
33
34
35
36
37
38
39
40
41
42
43
44
45
46
47
48
49
50
51
52
53
54
55
56

@Override
public void begin() {
startTime = LogTime.getLogTime();
if (model == null) {
onException(null);
return;
}

status = Status.WAITING_FOR_SIZE;
if (Util.isValidDimensions(overrideWidth, overrideHeight)) {
onSizeReady(overrideWidth, overrideHeight);
} else {
target.getSize(this);
}

if (!isComplete() && !isFailed() && canNotifyStatusChanged()) {
target.onLoadStarted(getPlaceholderDrawable());
}
if (Log.isLoggable(TAG, Log.VERBOSE)) {
logV("finished run method in " + LogTime.getElapsedMillis(startTime));
}
}

@Override
public void onSizeReady(int width, int height) {
if (Log.isLoggable(TAG, Log.VERBOSE)) {
logV("Got onSizeReady in " + LogTime.getElapsedMillis(startTime));
}
if (status != Status.WAITING_FOR_SIZE) {
return;
}
status = Status.RUNNING;

width = Math.round(sizeMultiplier * width);
height = Math.round(sizeMultiplier * height);

ModelLoader<A, T> modelLoader = loadProvider.getModelLoader();
final DataFetcher<T> dataFetcher = modelLoader.getResourceFetcher(model, width, height);

if (dataFetcher == null) {
onException(new Exception("Failed to load model: \'" + model + "\'"));
return;
}
ResourceTranscoder<Z, R> transcoder = loadProvider.getTranscoder();
if (Log.isLoggable(TAG, Log.VERBOSE)) {
logV("finished setup for calling load in " + LogTime.getElapsedMillis(startTime));
}
loadedFromMemoryCache = true;
loadStatus = engine.load(signature, width, height, dataFetcher, loadProvider, transformation, transcoder,
priority, isMemoryCacheable, diskCacheStrategy, this);
loadedFromMemoryCache = resource != null;
if (Log.isLoggable(TAG, Log.VERBOSE)) {
logV("finished onSizeReady in " + LogTime.getElapsedMillis(startTime));
}
}

这部分代码如果想要完全搞清楚就必须翻源码了,基本流程是begin()方法被执行之后,会等待onSizeReady的回调执行,这句不用看也知道意思是要等View被绘制出来拿到具体尺寸之后,才真正发起请求,因为Glide在加载图片的时候都会根据View的尺寸对源数据进行压缩,缓存也只会缓存这种数据(任何图片库都一样,毕竟内存吃紧)。在onSizeReady毁掉中,我们只看关键代码,其实就是Engineload()方法,我们再看这部分源码:

1
2
3
4
5
6
7
8
9
10
11
12
13
14
15
16
17
18
19
20
21
22
23
24
25
26
27
28
29
30
31
32
33
34
35
36
37
38
39
40
41
42
43
44
45
46
47
48
49
50
51
52
53
54

public <T, Z, R> LoadStatus load(Key signature, int width, int height, DataFetcher<T> fetcher,
DataLoadProvider<T, Z> loadProvider, Transformation<Z> transformation, ResourceTranscoder<Z, R> transcoder,
Priority priority, boolean isMemoryCacheable, DiskCacheStrategy diskCacheStrategy, ResourceCallback cb)
{

Util.assertMainThread();
long startTime = LogTime.getLogTime();

final String id = fetcher.getId();
EngineKey key = keyFactory.buildKey(id, signature, width, height, loadProvider.getCacheDecoder(),
loadProvider.getSourceDecoder(), transformation, loadProvider.getEncoder(),
transcoder, loadProvider.getSourceEncoder());
//从内存缓存中取数据
EngineResource<?> cached = loadFromCache(key, isMemoryCacheable);
if (cached != null) {
cb.onResourceReady(cached);
if (Log.isLoggable(TAG, Log.VERBOSE)) {
logWithTimeAndKey("Loaded resource from cache", startTime, key);
}
return null;
}

//从activeResources中取数据
EngineResource<?> active = loadFromActiveResources(key, isMemoryCacheable);
if (active != null) {
cb.onResourceReady(active);
if (Log.isLoggable(TAG, Log.VERBOSE)) {
logWithTimeAndKey("Loaded resource from active resources", startTime, key);
}
return null;
}

//内存缓存没有命中,发起一个EngineRunnable,请求源数据
EngineJob current = jobs.get(key);
if (current != null) {
current.addCallback(cb);
if (Log.isLoggable(TAG, Log.VERBOSE)) {
logWithTimeAndKey("Added to existing load", startTime, key);
}
return new LoadStatus(cb, current);
}

EngineJob engineJob = engineJobFactory.build(key, isMemoryCacheable);
DecodeJob<T, Z, R> decodeJob = new DecodeJob<T, Z, R>(key, width, height, fetcher, loadProvider, transformation,
transcoder, diskCacheProvider, diskCacheStrategy, priority);
EngineRunnable runnable = new EngineRunnable(engineJob, decodeJob, priority);
jobs.put(key, engineJob);
engineJob.addCallback(cb);
engineJob.start(runnable);

if (Log.isLoggable(TAG, Log.VERBOSE)) {
logWithTimeAndKey("Started new load", startTime, key);
}
return new LoadStatus(cb, engineJob);
}

这个方法比较长,但是只看方法名的话也完全可以理解,先从内存缓存中取数据,没有命中就从activeResources中取,还没有命中就发起一个EngineRunnable请求源数据,EngineRunnable会持有一个EngineJob和一个DecodeJob,我们依次来看它们的作用:

1
2
3
4
5
6
7
8
9
10
11
12
13
14
15
16
17
18
19
20
21
22
23
24
25
26
27
28
29
30
31
32
33
34
35
36
37
38
39
40
41
42
43
44
45
46
47
48
49
50
51
52
53
54
55
56
57
58
59

EngineJob.java

private final ExecutorService diskCacheService;
private final ExecutorService sourceService;

public void start(EngineRunnable engineRunnable) {
this.engineRunnable = engineRunnable;
future = diskCacheService.submit(engineRunnable);
}

@Override
public void submitForSource(EngineRunnable runnable) {
future = sourceService.submit(runnable);
}

EngineRunnable.java

private final EngineRunnableManager manager;

private void onLoadFailed(Exception e) {
if (isDecodingFromCache()) {
stage = Stage.SOURCE;
manager.submitForSource(this);
} else {
manager.onException(e);
}
}

@Override
public void run() {
if (isCancelled) {
return;
}

Exception exception = null;
Resource<?> resource = null;
try {
resource = decode();
} catch (Exception e) {
if (Log.isLoggable(TAG, Log.VERBOSE)) {
Log.v(TAG, "Exception decoding", e);
}
exception = e;
}

if (isCancelled) {
if (resource != null) {
resource.recycle();
}
return;
}

if (resource == null) {
onLoadFailed(exception);
} else {
onLoadComplete(resource);
}
}

贴代码的时候才发现这两部分必须一起分析···先看EngineJob,它内部有两个ExecutorService,很明显一个是用于请求磁盘数据,另一个用于请求源数据。EngineJob实现了EngineRunnableManager这个接口,它只是用来管理这两个线程池的相关操作,同时通过持有的ResourceCallbackEngineJobListener将结果回调给RequestEngine,线程具体的run()方法在我们上面贴出的EngineRunnable里面,然后我们再看这部分代码,本质上就是通过decode()方法进行数据请求,如果属于请求磁盘数据且失败了,那么就去请求源数据,最终将结果回调给EngineJob。那么关键就是这个decode()方法了:

1
2
3
4
5
6
7
8
9
10
11
12
13
14
15
16
17
18
19
20
21
22
23
24
25
26
27
28

private Resource<?> decode() throws Exception {
if (isDecodingFromCache()) {
return decodeFromCache();
} else {
return decodeFromSource();
}
}

private Resource<?> decodeFromCache() throws Exception {
Resource<?> result = null;
try {
result = decodeJob.decodeResultFromCache();
} catch (Exception e) {
if (Log.isLoggable(TAG, Log.DEBUG)) {
Log.d(TAG, "Exception decoding result from cache: " + e);
}
}

if (result == null) {
result = decodeJob.decodeSourceFromCache();
}
return result;
}

private Resource<?> decodeFromSource() throws Exception {
return decodeJob.decodeFromSource();
}

这部分代码只看方法名也很清晰,就是通过持有的DecodeJob分别从缓存(磁盘缓存)和数据源去取数据,然后就引出了真正干活的DecodeJob了:

1
2
3
4
5
6
7
8
9
10
11
12
13
14
15
16
17
18
19
20
21
22
23
24
25
26
27
28
29
30
31
32
33
34
35
36
37
38
39
40
41
42
43
44
45
46
47
48
49
50
51
52
53
54
55
56
57
58
59
60
61
62
63
64
65
66
67
68
69
70
71
72
73
74
75
76
77
78
79
80
81
82
83
84
85
86
87
88
89
90
91
92
93
94
95
96
97
98
99
100
101
102
103
104
105
106
107
108
109
110
111
112
113
114
115
116
117
118
119
120
121
122
123

//因为Glide磁盘缓存的策略中,可以选择缓存根据View尺寸压缩过后的文件。因此取缓存的第一步就是根据尺寸去取对应的缓存
public Resource<Z> decodeResultFromCache() throws Exception {
if (!diskCacheStrategy.cacheResult()) {
return null;
}

long startTime = LogTime.getLogTime();
Resource<T> transformed = loadFromCache(resultKey);
if (Log.isLoggable(TAG, Log.VERBOSE)) {
logWithTimeAndKey("Decoded transformed from cache", startTime);
}
startTime = LogTime.getLogTime();
Resource<Z> result = transcode(transformed);
if (Log.isLoggable(TAG, Log.VERBOSE)) {
logWithTimeAndKey("Transcoded transformed from cache", startTime);
}
return result;
}

//根据缓存策略当ResultCache没有命中时就从磁盘缓存中取源数据
public Resource<Z> decodeSourceFromCache() throws Exception {
if (!diskCacheStrategy.cacheSource()) {
return null;
}

long startTime = LogTime.getLogTime();
Resource<T> decoded = loadFromCache(resultKey.getOriginalKey());
if (Log.isLoggable(TAG, Log.VERBOSE)) {
logWithTimeAndKey("Decoded source from cache", startTime);
}
return transformEncodeAndTranscode(decoded);
}


//根据key获取磁盘缓存的具体代码
private Resource<T> loadFromCache(Key key) throws IOException {
File cacheFile = diskCacheProvider.getDiskCache().get(key);
if (cacheFile == null) {
return null;
}

Resource<T> result = null;
try {
result = loadProvider.getCacheDecoder().decode(cacheFile, width, height);
} finally {
if (result == null) {
diskCacheProvider.getDiskCache().delete(key);
}
}
return result;
}

//取缓存失败,就去取源数据(从网络或是从本地文件路径)
public Resource<Z> decodeFromSource() throws Exception {
Resource<T> decoded = decodeSource();
return transformEncodeAndTranscode(decoded);
}

//取源数据的具体过程
private Resource<T> decodeSource() throws Exception {
Resource<T> decoded = null;
try {
long startTime = LogTime.getLogTime();
final A data = fetcher.loadData(priority);
if (Log.isLoggable(TAG, Log.VERBOSE)) {
logWithTimeAndKey("Fetched data", startTime);
}
if (isCancelled) {
return null;
}
decoded = decodeFromSourceData(data);
} finally {
fetcher.cleanup();
}
return decoded;
}

//对取到的源数据进行解码操作
private Resource<T> decodeFromSourceData(A data) throws IOException {
final Resource<T> decoded;
if (diskCacheStrategy.cacheSource()) {
decoded = cacheAndDecodeSourceData(data);
} else {
long startTime = LogTime.getLogTime();
decoded = loadProvider.getSourceDecoder().decode(data, width, height);
if (Log.isLoggable(TAG, Log.VERBOSE)) {
logWithTimeAndKey("Decoded from source", startTime);
}
}
return decoded;
}

//对取到的数据进行transform转换,写入磁盘缓存以及转码操作,获取最终target需要的数据
private Resource<Z> transformEncodeAndTranscode(Resource<T> decoded) {
long startTime = LogTime.getLogTime();
Resource<T> transformed = transform(decoded);
if (Log.isLoggable(TAG, Log.VERBOSE)) {
logWithTimeAndKey("Transformed resource from source", startTime);
}

writeTransformedToCache(transformed);

startTime = LogTime.getLogTime();
Resource<Z> result = transcode(transformed);
if (Log.isLoggable(TAG, Log.VERBOSE)) {
logWithTimeAndKey("Transcoded transformed from source", startTime);
}
return result;
}

//写缓存
private void writeTransformedToCache(Resource<T> transformed) {
if (transformed == null || !diskCacheStrategy.cacheResult()) {
return;
}
long startTime = LogTime.getLogTime();
SourceWriter<Resource<T>> writer = new SourceWriter<Resource<T>>(loadProvider.getEncoder(), transformed);
diskCacheProvider.getDiskCache().put(resultKey, writer);
if (Log.isLoggable(TAG, Log.VERBOSE)) {
logWithTimeAndKey("Wrote transformed from source to cache", startTime);
}
}

这部分代码比较多,但是也基本就是取源数据的全部了。那么以一个网络请求数据源为例,这部分代码在哪里呢?就在decodeSource()里的final A data = fetcher.loadData(priority);这一句了,这个DataFetcher的所有实现类,就是从所有路径取请求源数据的实现了,我们以OkHttp对应的OkHttpSteamFetcher为例:

1
2
3
4
5
6
7
8
9
10
11
12
13
14
15
16
17
18
19
20
21
22
23

@Override
public InputStream loadData(Priority priority) throws Exception {
Request.Builder requestBuilder = new Request.Builder().url(url.toStringUrl());

for (Map.Entry<String, String> headerEntry : url.getHeaders().entrySet()) {
String key = headerEntry.getKey();
requestBuilder.addHeader(key, headerEntry.getValue());
}
Request request = requestBuilder.build();

Response response;
call = client.newCall(request);
response = call.execute();
responseBody = response.body();
if (!response.isSuccessful()) {
throw new IOException("Request failed with code: " + response.code());
}

long contentLength = responseBody.contentLength();
stream = ContentLengthInputStream.obtain(responseBody.byteStream(), contentLength);
return stream;
}

用过OkHttp的同学都知道,这是OkHttp最基本的一个请求,通过这个请求,我们也通过传入的路径拿到了我们需要的数据流。到这时候,一个完整的请求就基本结束了。

不过还没完,因为数据拿到了,也处理完了,还没显示在View上,这时候就要回头看Request拿到的请求结果的回调里做了什么了,还是以实现类GenericRequest为例:

1
2
3
4
5
6
7
8
9
10
11
12
13
14
15
16
17
18
19
20

private void onResourceReady(Resource<?> resource, R result) {
// We must call isFirstReadyResource before setting status.
boolean isFirstResource = isFirstReadyResource();
status = Status.COMPLETE;
this.resource = resource;

if (requestListener == null || !requestListener.onResourceReady(result, model, target, loadedFromMemoryCache,
isFirstResource)) {
GlideAnimation<R> animation = animationFactory.build(loadedFromMemoryCache, isFirstResource);
target.onResourceReady(result, animation);
}

notifyLoadSuccess();

if (Log.isLoggable(TAG, Log.VERBOSE)) {
logV("Resource ready in " + LogTime.getElapsedMillis(startTime) + " size: "
+ (resource.getSize() * TO_MEGABYTE) + " fromCache: " + loadedFromMemoryCache);
}
}

与我们预期的一致,请求结果被传递给Request对应的targetonResourceReady方法,在这个方法里完成了最终数据与View的绑定工作。到这时候,一个完整的图片加载过程就完成了。

总结

当然,我们这一篇的分析真是跟着源码把数据请求的过程走了一遍,其中还有许多有意思的设计并没有设计。比如在Target的实现类ViewTarget中,会通过view.setTag()方法实现与Request的绑定,避免了同一个View的重复请求;通过抽象出一个ModelLoaderDataFetcher使使用者能够任意自定义底层数据请求的方式;通过抽象出Transformation使使用者能够在拿到最终数据之前进行自定义的处理。个人认为Glide优于Picasso的地方也在这里,就是极致的可扩展性。这部分原理靠文字是无法完全描述清楚的,还是需要从源码中寻找答案。

Glide源码分析-生命周期管理

基本概念

GlidePicasso有着基本一致的使用方法,最基本的使用方式如下:

1
2
3
4

Glide.with(Context/Activity/Fragment).load(url).into(view);

Picasso.with(Context).load(url).into(view);

但是我们从代码中能看到,Glide比较特殊的地方时可以传入ContextActivityFragment三种不同的对象作为上下文,这也是Glide第一个比较突出的特点,就是严格使用的话,加载图片的过程会绑定对应页面的生命周期,尽可能地提升加载效率。

生命周期绑定基本流程

生命周期绑定类设计图

相关类的介绍

  • Glide:总入口类,调用with(Context/Activity/Fragment)方法获取对应的RequestManager
  • RequestManagerRetriever:单例,根据Glide.with()方法传入的上下文构建RequestManager和对应的RequestManagerFragment并进行生命周期的绑定
  • RequestManagerFragment:一个无页面的Fragment,与Glide传入的Activity或者Fragment通过FragmentManager完成与加载请求生命周期的绑定,同时持有对应所有上下文的RequestManager,当生命周期改变时时回调对应的生命周期方法
  • LifecycleListener:生命周期回调接口,当对应的生命周期发生变化时收到通知
  • Lifecycle:生命周期接口,所有类型的RequestManagerFragment都持有该接口的实现类ActivityFragmentLifecycleRequestManagerFragment的生命周期发生变化时回调对应的方法
  • RequestManager:实现了LifecycleListener接口,收到生命周期变化回调时调用持有的Ruquest的对应方法

源码分析

只分析类的作用是不够的,不看代码根本解释不清楚。然后我们就以一个基本的Glide请求为例,看看在构建Request之前都发生了什么。
首先是Glide.with()方法,以Glide.with(fragment)为例

1
2
3
4
5

public static RequestManager with(Fragment fragment) {
RequestManagerRetriever retriever = RequestManagerRetriever.get();
return retriever.get(fragment);
}

只看到是生成一个RequestManagerRetriever对象,然后调用对应的get(fragment)方法,那么我们再看这部分源码:

1
2
3
4
5
6
7
8
9
10
11
12
13
14
15
16
17
18

private static final RequestManagerRetriever INSTANCE = new RequestManagerRetriever();

public static RequestManagerRetriever get() {
return INSTANCE;
}

public RequestManager get(Fragment fragment) {
if (fragment.getActivity() == null) {
throw new IllegalArgumentException("You cannot start a load on a fragment before it is attached");
}
if (Util.isOnBackgroundThread()) {
return get(fragment.getActivity().getApplicationContext());
} else {
FragmentManager fm = fragment.getChildFragmentManager();
return supportFragmentGet(fragment.getActivity(), fm);
}
}

首先get()方法很简单,就是一个单例模式。然后是get(fragment)方法,我们只看fragment可用的情况,这时候首先拿到那个fragment对应的FragmentManager,然后再返回supportFragmentGet方法,那么再看这部分源码:

1
2
3
4
5
6
7
8
9
10
11
12
13
14
15
16
17
18
19
20
21
22
23
24
25
26
27
28
29
30
31
32
33
34
35
36
37
38
39
40
41
42
43
44
45
46
47
48
49
50
51
52
53
54
55
56
57
58
59
60
61
62

RequestManager supportFragmentGet(Context context, FragmentManager fm) {
//获取当前请求上下文对应FragmentManager内部用于绑定生命周期的RequestManagerFragment
SupportRequestManagerFragment current = getSupportRequestManagerFragment(fm);
//获取RequestManagerFragment内部绑定的RequestManager
RequestManager requestManager = current.getRequestManager();
if (requestManager == null) {
//如果为空,则new一个RequestManager,并完成生命周期回调方法的互相绑定
requestManager = new RequestManager(context, current.getLifecycle(), current.getRequestManagerTreeNode());
current.setRequestManager(requestManager);
}
return requestManager;
}

static final String FRAGMENT_TAG = "com.bumptech.glide.manager";

//以FragmentManager为key,RequestManagerFragment为value缓存用以绑定寿命周期的RequestManagerFragment,严格说这不是一个缓存,只是用来暂时保存已生成的还未被使用的RequestManagerFragment
final Map<FragmentManager, SupportRequestManagerFragment> pendingSupportRequestManagerFragments =
new HashMap<FragmentManager, SupportRequestManagerFragment>();

SupportRequestManagerFragment getSupportRequestManagerFragment(final FragmentManager fm) {
//先从FragmentManager根据TAG获取RequestManagerFragment
SupportRequestManagerFragment current = (SupportRequestManagerFragment) fm.findFragmentByTag(FRAGMENT_TAG);
if (current == null) {
//如果为空,再从pending缓存里获取
current = pendingSupportRequestManagerFragments.get(fm);
if (current == null) {
//如果为空,则生成一个新的RequestManagerFragment并add到对应的FragmentManager里
current = new SupportRequestManagerFragment();
pendingSupportRequestManagerFragments.put(fm, current);
fm.beginTransaction().add(current, FRAGMENT_TAG).commitAllowingStateLoss();
handler.obtainMessage(ID_REMOVE_SUPPORT_FRAGMENT_MANAGER, fm).sendToTarget();
}
}
return current;
}

//当RequestManagerFragment被成功add之后从pending缓存中remove掉
@Override
public boolean handleMessage(Message message) {
boolean handled = true;
Object removed = null;
Object key = null;
switch (message.what) {
case ID_REMOVE_FRAGMENT_MANAGER:
android.app.FragmentManager fm = (android.app.FragmentManager) message.obj;
key = fm;
removed = pendingRequestManagerFragments.remove(fm);
break;
case ID_REMOVE_SUPPORT_FRAGMENT_MANAGER:
FragmentManager supportFm = (FragmentManager) message.obj;
key = supportFm;
removed = pendingSupportRequestManagerFragments.remove(supportFm);
break;
default:
handled = false;
}
if (handled && removed == null && Log.isLoggable(TAG, Log.WARN)) {
Log.w(TAG, "Failed to remove expected request manager fragment, manager: " + key);
}
return handled;
}

这部分源码比较长,结合注释看容易理清楚。本质上就是根据传入的上下文对应的FragmentManager生成对应的RequestManagerRequestManagerFragment并完成互相绑定的过程,那么接下来就看生命周期绑定的过程,也是核心部分,首先看RequestManagerFragment的相关部分:

1
2
3
4
5
6
7
8
9
10
11
12
13
14
15
16
17
18
19
20
21
22
23
24
25
26
27
28
29
30
31
32
33
34
35
36
37
38
39
40
41
42
43
44
45
46
47
48
49
50
51
52
53
54
55
56

public class SupportRequestManagerFragment extends Fragment {
private RequestManager requestManager;
private final ActivityFragmentLifecycle lifecycle;

public SupportRequestManagerFragment() {
this(new ActivityFragmentLifecycle());
}

// For testing only.
@SuppressLint("ValidFragment")
public SupportRequestManagerFragment(ActivityFragmentLifecycle lifecycle) {
this.lifecycle = lifecycle;
}

public void setRequestManager(RequestManager requestManager) {
this.requestManager = requestManager;
}

ActivityFragmentLifecycle getLifecycle() {
return lifecycle;
}

public RequestManager getRequestManager() {
return requestManager;
}

@Override
public void onStart() {
super.onStart();
lifecycle.onStart();
}

@Override
public void onStop() {
super.onStop();
lifecycle.onStop();
}

@Override
public void onDestroy() {
super.onDestroy();
lifecycle.onDestroy();
}

@Override
public void onLowMemory() {
super.onLowMemory();
// If an activity is re-created, onLowMemory may be called before a manager is ever set.
// See #329.
if (requestManager != null) {
requestManager.onLowMemory();
}
}

}

这部分源码删掉了不相关的代码,只看生命周期相关的方法。所以很明白,这个RequestManagerFragment继承自系统的Fragment,并持有对应的RequestManagerActivityFragmentLifecycle,当生命周期发生变化时会调用这两个对象对应的方法。然后我们再看ActivityFragmentLifecycle的源码:

1
2
3
4
5
6
7
8
9
10
11
12
13
14
15
16
17
18
19
20
21
22
23
24
25
26
27
28
29
30
31
32
33
34
35
36
37
38
39
40

class ActivityFragmentLifecycle implements Lifecycle {
private final Set<LifecycleListener> lifecycleListeners =
Collections.newSetFromMap(new WeakHashMap<LifecycleListener, Boolean>());
private boolean isStarted;
private boolean isDestroyed;

@Override
public void addListener(LifecycleListener listener) {
lifecycleListeners.add(listener);
if (isDestroyed) {
listener.onDestroy();
} else if (isStarted) {
listener.onStart();
} else {
listener.onStop();
}
}

void onStart() {
isStarted = true;
for (LifecycleListener lifecycleListener : Util.getSnapshot(lifecycleListeners)) {
lifecycleListener.onStart();
}
}

void onStop() {
isStarted = false;
for (LifecycleListener lifecycleListener : Util.getSnapshot(lifecycleListeners)) {
lifecycleListener.onStop();
}
}

void onDestroy() {
isDestroyed = true;
for (LifecycleListener lifecycleListener : Util.getSnapshot(lifecycleListeners)) {
lifecycleListener.onDestroy();
}
}
}

也很简单,ActivityFragmentLifecycle实现了Lifecycle接口,持有一群(手动斜眼)lifecycleListener,当它的生命周期方法被调用时,也会调用所有lifecycleListener对应的方法。那么是谁把这些lifecycleListener给add进来,谁实现了这个接口,最终在收到生命周期变化的通知时做出处理呢?答案就在RequestManager里:

1
2
3
4
5
6
7
8
9
10
11
12
13
14
15
16
17
18
19
20
21
22
23
24
25
26
27
28

RequestManager(Context context, final Lifecycle lifecycle, RequestManagerTreeNode treeNode,
RequestTracker requestTracker, ConnectivityMonitorFactory factory) {
this.context = context.getApplicationContext();
this.lifecycle = lifecycle;
this.treeNode = treeNode;
this.requestTracker = requestTracker;
this.glide = Glide.get(context);
this.optionsApplier = new OptionsApplier();

ConnectivityMonitor connectivityMonitor = factory.build(context,
new RequestManagerConnectivityListener(requestTracker));

// If we're the application level request manager, we may be created on a background thread. In that case we
// cannot risk synchronously pausing or resuming requests, so we hack around the issue by delaying adding
// ourselves as a lifecycle listener by posting to the main thread. This should be entirely safe.
if (Util.isOnBackgroundThread()) {
new Handler(Looper.getMainLooper()).post(new Runnable() {
@Override
public void run() {
lifecycle.addListener(RequestManager.this);
}
});
} else {
lifecycle.addListener(this);
}
lifecycle.addListener(connectivityMonitor);
}

刚才在RequestManagerRetriever的源码里我们知道了,在生成RequestManager时它会持有对应RequestManagerFragment内部的Lifecycle,当它的构造方法被调用时,同时会把自己给add进去,这时候生命周期已经完全绑定,RequestManager已经可以拿到对应所有请求的生命周期回调。细心的同学会发现还会add一个ConnectivityMonitor,这个就属于响应网络变化的优化工作了,有兴趣的同学可以看相关源码。然后我们再看回调方法:

1
2
3
4
5
6
7
8
9
10
11
12
13
14
15

@Override
public void onStart() {
resumeRequests();
}

@Override
public void onStop() {
pauseRequests();
}

@Override
public void onDestroy() {
requestTracker.clearRequests();
}

这部分代码很容易明白了,就是在页面发生变化时,请求也随之响应,达到效率最大化。

总结

Ok,关于Glide请求的生命周期管理就基本分析完毕,Glide看起来跟Picasso用法基本一致,设计也类似,但是多出那么多方法并不凭空来的,单只是用一个不可见的Fragment实现了对一个上下文的ActivityFragment生命周期的监控,这部分的实现就非常巧妙。下一部分,我们继续分析 Glide构建Request完成后,接下来具体请求的过程。

Glide源码分析-概述

基本概念

项目地址:https://github.com/bumptech/glide
基于Glide当前的稳定版本3.7.0

基本流程

glide_process

大的流程与其他的图片加载库没有本质区别,都是构建一个图片加载请求,然后通过Engine先从内存缓存中获取数据,如果命中缓存则直接回调主线程并对View层进行对应处理;如果未命中缓存,则调起一个DecodeJob请求原始数据,先请求磁盘缓存,未命中则进行网络请求,最终将结果回调主线程。

类设计图

glide_class

主要组件的概念

Glide 入口类

Glide

  • 向外暴露单例静态接口,通过传入的Context构建RequestManager
  • 持有一些内存变量BitmapPool,MemoryCache,便于外界调用清理缓存
  • 同时在构造方法里完成GenericLoaderFactoryTranscoderRegistyDataLoaderRegisty对多种数据和资源类型的注册(这几个类的作用后面分析)

GlideBuilder

  • 构建Glide对象,配置默认的缓存策略和图片解码格式

RequestManager 请求管理类

RequestManager

  • 通过load系列方法,构建具体的请求
  • 通过持有的RequestTracker对象管理当前RequestManager下所有请求的生命周期

RequestTracker

  • 对具体请求的行为进行管理

RequestManagerRetriever

  • 单例,通过传入的ContextFragment获取对应的RequestManager

Request 请求类

  • 持有一个具体请求的所有信息,包括所有主动行为和状态的回调,通过Engine进行具体的数据请求,同时将回调结果通知Target

Engine 引擎类

Engine

  • 请求数据并拿到回调结果
  • 请求数据分为三步:先请求内存缓存MemoryCache,未命中则继续请求activeResources(具体会在缓存部分分析),仍然未命中则会调起一个EngineRunnable,开启一个线程进行具体请求

EngineRunnable

  • 实现了Runnable接口,用DecodeJob进行数据请求并将回调传递给EngineJob

EngineJob

  • 管理对应Engine所有请求的ResourceCallback

DecodeJob 原始对象处理类

DecodeJob

  • 进行具体取数据和数据转换的操作,包括从磁盘缓存和通过网络请求拿到原始数据,并将原始数据通过ResourceDecoderTransformationResourceTranscoder转换成最终Target需要的数据类型
  • 在通过网络请求拿到数据后也进行了写入磁盘缓存的操作

Cache缓存部分

MemoryCache内存缓存接口

  • 资源被释放时写入,在Engine类里从内存中获取数据时查询

DishCache磁盘缓存接口

  • DecodeJob从磁盘中获取数据时查询,请求网络拿到原始数据时写入

BitmapPool接口

  • 设计思路是根据尺寸和属性缓存理论上会被重复使用的Bitmap对象,在有新的加载过程要用到同样的Bitmap时避免重复创建Bitmap,在RecyclerView这种会有大量可复用的相同尺寸和属性Bitmap的场景下效果明显
  • Transformation中构建Bitmap时查询,在任意位置的Bitmap对象准备被释放时缓存

Engine中的activeResources

  • 这是一个弱引用的内存缓存,当MemoryCache中的缓存因为某些情况被remove掉时,会再在这个内存缓存里查询到,不会对使用中的Bitmap造成影响

可扩展接口

ModelLoader和对应的DataFetcher

  • 可以配置自己的网络请求和数据类型

Transformation接口

  • 可以配置自己的Bitmap或者其他类型数据的处理方案,默认的centerCrop()fitCenter方法都是实现了具体的Transformation接口

Target接口

  • 可以配置更复杂的View或其他业务层组件,Glide负责管理请求、缓存和数据转换。

Glide主要的类和接口基本就是这些,通过这些接口的关系我们已经基本能知道Glide进行一次完成的图片数据请求以及加载到View的过程了。